Introduction
A Flexible Framework for Experiencing Cutting-edge LLM Inference/Fine-tune Optimizations
🎯 Overview | 🚀 Inference | 🎓 SFT | 🔥 Citation | 🚀 Roadmap(2026Q2)🎯 Overview
KTransformers is a research project focused on efficient inference and fine-tuning of large language models through CPU-GPU heterogeneous computing. The project now exposes two user-facing capabilities from the kt-kernel source tree: Inference and SFT.
🔥 Updates
- May 6, 2026: KTransformers at GOSIM Paris 2026 — “Agentic AI on Edge” track. We’ll present KT’s inference performance on consumer hardware.
- May 02, 2026: DeepSeek-V4-Flash Support! (Tutorial)
- Apr 30, 2026: KTransformers v0.6.1 refreshes kt-kernel inference and SFT docs with separate Inference and SFT Quick Start entry points.
- Mar 26, 2026: Support AVX2-only CPU backend for KT-Kernel inference. (Tutorial)
- Feb 13, 2026: MiniMax-M2.5 Day0 Support! (Tutorial)
- Feb 12, 2026: GLM-5 Day0 Support! (Tutorial)
- Jan 27, 2026: Kimi-K2.5 Day0 Support! (Tutorial) (SFT Tutorial)
- Jan 22, 2026: Support CPU-GPU Expert Scheduling, Native BF16 and FP8 per channel Precision and AutoDL unified fine-tuning and inference
- Dec 24, 2025: Support Native MiniMax-M2.1 inference. (Tutorial)
- Dec 22, 2025: Support RL-DPO fine-tuning with LLaMA-Factory. (Tutorial)
- Dec 5, 2025: Support Native Kimi-K2-Thinking inference (Tutorial)
- Nov 6, 2025: Support Kimi-K2-Thinking inference (Tutorial) and fine-tune (Tutorial)
- Nov 4, 2025: KTransformers Fine-Tuning × LLaMA-Factory Integration. (Tutorial)
- Oct 27, 2025: Support Ascend NPU. (Tutorial)
- Oct 10, 2025: Integrating into SGLang. (Roadmap, Blog)
- Sept 11, 2025: Support Qwen3-Next. (Tutorial)
- Sept 05, 2025: Support Kimi-K2-0905. (Tutorial)
- July 26, 2025: Support SmallThinker and GLM4-MoE. (Tutorial)
- July 11, 2025: Support Kimi-K2. (Tutorial)
- June 30, 2025: Support 3-layer (GPU-CPU-Disk) prefix cache reuse.
- May 14, 2025: Support Intel Arc GPU (Tutorial).
- Apr 29, 2025: Support AMX-Int8、 AMX-BF16 and Qwen3MoE (Tutorial)
- Apr 9, 2025: Experimental support for LLaMA 4 models (Tutorial).
- Apr 2, 2025: Support Multi-concurrency. (Tutorial).
- Mar 15, 2025: Support ROCm on AMD GPU (Tutorial).
- Mar 5, 2025: Support unsloth 1.58/2.51 bits weights and IQ1_S/FP8 hybrid weights. Support 139K Longer Context for DeepSeek-V3 and R1 in 24GB VRAM.
- Feb 25, 2025: Support FP8 GPU kernel for DeepSeek-V3 and R1; Longer Context.
- Feb 15, 2025: Longer Context (from 4K to 8K for 24GB VRAM) & Slightly Faster Speed (+15%, up to 16 Tokens/s), update docs and online books.
- Feb 10, 2025: Support Deepseek-R1 and V3 on single (24GB VRAM)/multi gpu and 382G DRAM, up to 3~28x speedup. For detailed show case and reproduction tutorial, see here.
- Aug 28, 2024: Decrease DeepseekV2’s required VRAM from 21G to 11G.
- Aug 15, 2024: Update detailed tutorial for injection and multi-GPU.
- Aug 14, 2024: Support llamfile as linear backend.
- Aug 12, 2024: Support multiple GPU; Support new model: mixtral 8*7B and 8*22B; Support q2k, q3k, q5k dequant on gpu.
- Aug 9, 2024: Support windows native.
📦 Capabilities
🚀 Inference - High-Performance kt-kernel Serving
CPU-optimized kernel operations for heterogeneous LLM inference.
Key Features:
- AMX/AVX Acceleration: Intel AMX and AVX512/AVX2 optimized kernels for INT4/INT8 quantized inference
- MoE Optimization: Efficient Mixture-of-Experts inference with NUMA-aware memory management
- Quantization Support: CPU-side INT4/INT8 quantized weights, GPU-side GPTQ support
- Easy Integration: Clean Python API for SGLang and other frameworks
Quick Start:
cd kt-kernel
pip install .
Use Cases:
- CPU-GPU hybrid inference for large MoE models
- Integration with SGLang for production serving
- Heterogeneous expert placement (hot experts on GPU, cold experts on CPU)
Performance Examples:
| Model | Hardware Configuration | Total Throughput | Output Throughput |
|---|---|---|---|
| DeepSeek-R1-0528 (FP8) | 8×L20 GPU + Xeon Gold 6454S | 227.85 tokens/s | 87.58 tokens/s (8-way concurrency) |
🎓 SFT - Fine-Tuning with LLaMA-Factory
KTransformers × LLaMA-Factory integration for ultra-large MoE model fine-tuning.
Key Features:
- Multi-Backend Support: CPU/GPU hybrid fine-tuning with INT8/INT4 quantization
- Ultra-Large MoE Support: Fine-tune models like DeepSeek-V3/R1 on limited GPU memory
- Faster than ZeRO-Offload: 6-12x training speedup in benchmarked MoE SFT workloads
- Lower CPU Memory: About half the CPU memory of the previous KT SFT path in the benchmarked setup
- LLaMA-Factory Integration: Seamless integration with popular fine-tuning framework
| Model | GPU Memory | Training Speed | Hardware |
|---|---|---|---|
| DeepSeek-V3 | ~80GB total | 3.7 it/s | 4x RTX 4090 |
| DeepSeek-R1 | ~80GB total | 3.7 it/s | 4x RTX 4090 |
| Qwen3-30B-A3B | ~24GB total | 8+ it/s | 1x RTX 4090 |
Quick Start:
cd /path/to/LLaMA-Factory
pip install -e .
pip install -r requirements/ktransformers.txt
CUDA_VISIBLE_DEVICES=0,1,2,3 accelerate launch \
  --config_file examples/ktransformers/accelerate/fsdp2_kt_int8.yaml \
  src/train.py \
  examples/ktransformers/train_lora/qwen3_5moe_lora_sft_kt.yaml
👉 Quick Start → 👉 Full Documentation →
🔥 Citation
If you use KTransformers in your research, please cite our paper:
@inproceedings{10.1145/3731569.3764843,
  title = {KTransformers: Unleashing the Full Potential of CPU/GPU Hybrid Inference for MoE Models},
  author = {Chen, Hongtao and Xie, Weiyu and Zhang, Boxin and Tang, Jingqi and Wang, Jiahao and Dong, Jianwei and Chen, Shaoyuan and Yuan, Ziwei and Lin, Chen and Qiu, Chengyu and Zhu, Yuening and Ou, Qingliang and Liao, Jiaqi and Chen, Xianglin and Ai, Zhiyuan and Wu, Yongwei and Zhang, Mingxing},
  booktitle = {Proceedings of the ACM SIGOPS 31st Symposium on Operating Systems Principles},
  year = {2025}
}
👥 Contributors & Team
Developed and maintained by:
- MADSys Lab @ Tsinghua University
- Approaching.AI
- 9#AISoft
- Community contributors
We welcome contributions! Please feel free to submit issues and pull requests.
💬 Community & Support
- GitHub Issues: Report bugs or request features
- WeChat Group: See archive/WeChatGroup.png
📦 KT original Code
The original integrated KTransformers framework has been archived to the archive/ directory for reference. The project now organizes the two capabilities above from the kt-kernel source tree for clearer documentation and maintenance.
For the original documentation with full quick-start guides and examples, see:
- archive/README.md (English)
- archive/README_ZH.md (中文)
KT-Kernel
High-performance kernel operations for KTransformers, featuring CPU-optimized MoE inference with AMX, AVX, KML and blis (amd library) support.
- Note
- Features
- Installation
- Verification
- KT CLI Overview
- Integration with SGLang
- Direct Python API Usage
- Build Configuration
- Error Troubleshooting
- Weight Quantization
- Before Commit!
Note
Current Support Status:
- ✅ Native Precision with AVX512/AMX: Supported with AVX512 CPUs in
FP8,BF16andRAWINT4format - Guide - ✅ Intel CPUs with AMX: Fully supported (using weights converted to INT4/INT8 format)
- ✅ Universal CPU (llamafile backend): Supported (using GGUF-format weights)
- ✅ AMD CPUs with BLIS: Supported (for int8 prefill & decode) - Guide
KT-CLI
We are developing a simpler way to use KTransformers. Check out the KT-CLI Guide for more details.
Features
- CPU-Optimized MoE Kernels: High-throughput MoE expert kernels optimized for instruction sets.
- AVX512 Native Precision Backend: FP8 / BF16 / INT4 native MoE backend for AVX512-capable servers.
- AMX INT4/INT8 Backend: INT4 / INT8 quantized expert inference backend for AMX-capable servers.
- Llamafile CPU Backend: AVX2/AVX512-based MoE backend built on Llamafile for universal CPU deployment.
- NUMA-Aware Execution: Thread pool and memory layout designed for multi-socket / multi-NUMA machines.
Installation
Option 1: Install from PyPI (Recommended for Most Users)
Install the latest version with a single command:
pip install kt-kernel
Note: Check the latest version on PyPI
Features:
- ✅ Automatic CPU detection: Detects your CPU and loads the optimal kernel variant
- ✅ CPU multi-variant support: Includes AMX, AVX512 (Base/VNNI/VBMI/BF16), and AVX2 variants
- ✅ CUDA support included: GPU acceleration for NVIDIA GPUs (SM 80, 86, 89, 90)
- ✅ No compilation needed: Pre-built wheels for Python 3.10, 3.11, 3.12
- ✅ Static CUDA runtime: No CUDA toolkit installation required
- ✅ Works on CPU-only systems: CUDA features automatically disabled when GPU not available
Requirements:
- Python 3.10, 3.11, or 3.12
- Linux x86-64 (manylinux_2_17 compatible)
- CPU with AVX2 support (Intel Haswell 2013+, AMD Zen+)
- Optional: NVIDIA GPU with compute capability 8.0+ for CUDA features
CUDA Installation (GPU Acceleration)
For NVIDIA GPU-accelerated inference:
pip install kt-kernel
Features:
- ✅ Multi-architecture support: Single wheel supports SM 80/86/89/90 (Ampere, Ada, Hopper)
- ✅ Static CUDA runtime: No CUDA toolkit installation required
- ✅ Broad compatibility: Works with CUDA 11.8+ and 12.x drivers
- ✅ PyTorch compatible: Works with any PyTorch CUDA variant (cu118, cu121, cu124)
Requirements:
- Python 3.10, 3.11, or 3.12
- Linux x86-64 (manylinux_2_17 compatible)
- NVIDIA GPU with compute capability 8.0+ (Ampere or newer)
- ✅ Supported: A100, RTX 3000/4000 series, H100
- ❌ Not supported: V100, P100, GTX 1000/2000 series (too old)
- NVIDIA driver with CUDA 11.8+ or 12.x support (no CUDA toolkit needed)
GPU Compatibility Matrix:
| GPU Architecture | Compute Capability | Supported | Example GPUs |
|---|---|---|---|
| Hopper | 9.0 | ✅ | H100, H200 |
| Ada Lovelace | 8.9 | ✅ | RTX 4090, 4080, 4070 |
| Ampere | 8.6 | ✅ | RTX 3090, 3080, 3070, 3060 |
| Ampere | 8.0 | ✅ | A100, A30 |
| Turing | 7.5 | ❌ | RTX 2080, T4 |
| Volta | 7.0 | ❌ | V100 |
CUDA Driver Compatibility (for GPU features):
- CUDA 11.8, 11.9, 12.0-12.6+: Full support
- CUDA 11.0-11.7: Not supported (upgrade driver or use CPU-only)
CPU Variants Included:
The wheel includes 6 optimized variants that are automatically selected at runtime based on your CPU:
| Variant | CPU Support | Performance | Auto-Selected When |
|---|---|---|---|
| AMX | Intel Sapphire Rapids+ (2023+) | ⚡⚡⚡ Best | AMX instructions detected |
| AVX512+BF16 | Ice Lake server, Zen 4+ (2021+) | ⚡⚡⚡ Excellent | AVX512 + BF16 detected |
| AVX512+VBMI | Ice Lake client (2019+) | ⚡⚡ Great | AVX512 + VBMI detected |
| AVX512+VNNI | Cascade Lake+ (2019+) | ⚡⚡ Great | AVX512 + VNNI detected |
| AVX512 Base | Skylake-X+ (2017+) | ⚡⚡ Good | AVX512 base detected |
| AVX2 | Haswell+ (2013+), AMD Zen+ | ⚡ Good | Fallback for maximum compatibility |
Verify installation:
import kt_kernel

# Check which CPU variant was loaded
print(f"CPU variant: {kt_kernel.__cpu_variant__}")
print(f"Version: {kt_kernel.__version__}")

# Check CUDA support
from kt_kernel import kt_kernel_ext
cpu_infer = kt_kernel_ext.CPUInfer(4)
has_cuda = hasattr(cpu_infer, 'submit_with_cuda_stream')
print(f"CUDA support: {has_cuda}")

print("✓ kt-kernel installed successfully!")
Environment Variables:
# Override automatic CPU detection (for testing or debugging)
export KT_KERNEL_CPU_VARIANT=avx2  # Force specific variant

# Enable debug output to see detection process
export KT_KERNEL_DEBUG=1
python -c "import kt_kernel"
Option 2: Install from Source (For Local Use or Custom Builds)
Build from source for local installation or when you need AMD (BLIS), ARM (KML), or custom CUDA versions.
Prerequisites
First, initialize git submodules and create a conda environment:
git submodule update --init --recursive
conda create -n kt-kernel python=3.11 -y
conda activate kt-kernel
Quick Installation (Recommended)
Simply run the install script - it will auto-detect your CPU and optimize for best performance:
./install.sh
What happens automatically:
- Auto-detects CPU capabilities (AMX, AVX512_VNNI, AVX512_BF16)
- Installs system dependencies (
cmake,libhwloc-dev,pkg-config) - Builds optimized binary for your CPU only (using
-march=native) - Software fallbacks: Automatically enabled for CPUs without VNNI/BF16
Optional: Two-step installation
./install.sh deps   # Install dependencies only
./install.sh build  # Build and install kt-kernel
CPU Requirements by Backend:
| Backend | Minimum CPU Requirement | Example CPUs | Notes |
|---|---|---|---|
| LLAMAFILE | AVX2 | Intel Haswell (2013+), AMD Zen+ | Universal compatibility |
| RAWINT4 | AVX512F + AVX512BW | Intel Skylake-X (2017+), Ice Lake, Cascade Lake | Software fallbacks for VNNI/BF16 |
| AMXINT4/INT8 | AMX | Intel Sapphire Rapids (2023+) | Best performance, requires AMX hardware |
| FP8 | AVX512F + AVX512BW + AVX512_BF16 + AVX512_VBMI | Intel Cooper Lake (2020+), Sapphire Rapids (2023+); AMD Zen 4+ (e.g., EPYC 9355) | Native Precision (e.g., DeepSeek V3.2, MiniMax M2.1) |
| BF16 | AVX512F + AVX512BW + AVX512_BF16 | Intel Cooper Lake (2020+), Sapphire Rapids (2023+); AMD Zen 4+ (e.g., EPYC 9355) | Native Precision (e.g., Qwen3-235B-A22B, GLM-4.7) |
Software Fallback Support (AVX512 backends):
- ✅ VNNI fallback: Uses AVX512BW instructions
- ✅ BF16 fallback: Uses AVX512F instructions
- ✅ Older AVX512 CPUs (Skylake-X, Cascade Lake) can run RAWINT4 with fallbacks
⚠️ Portability Note: The default build is optimized for your specific CPU and may not work on different/older CPUs. For portable builds or binary distribution, see Manual Configuration below.
⚠️ AMD BLIS backend users: See installation guide for AMD-specific setup.
Verification
After installation, verify that the CLI is working:
kt version
Expected output:
KTransformers CLI v0.x.x

  Python:        3.11.x
  Platform:      Linux 5.15.0-xxx-generic
  CUDA:          12.x
  kt-kernel:     0.x.x (amx)
  sglang:        0.x.x
You can also verify the Python module directly:
python -c "from kt_kernel import KTMoEWrapper; print('✓ kt-kernel installed successfully')"
KT CLI Overview
The kt command-line tool provides a unified interface for running and managing KTransformers models:
| Command | Description |
|---|---|
kt run <model> | Start model inference server with auto-optimized parameters |
kt chat | Interactive chat with a running model server |
kt model | Manage models and storage paths |
kt doctor | Diagnose environment issues and check system compatibility |
kt config | Manage CLI configuration |
kt version | Show version information |
Quick Start Example:
# Start a model server (auto-detects hardware and applies optimal settings)
kt run m2

# In another terminal, chat with the model
kt chat

# Check system compatibility
kt doctor
Run kt --help for more options, or kt <command> --help for command-specific help.
Integration with SGLang
KT-Kernel can be used standalone via Direct Python API or integrated with SGLang for production deployment. This section describes SGLang integration to enable CPU-GPU heterogeneous inference, where “hot” experts run on GPU and “cold” experts run on CPU for optimal resource utilization.
Installation Steps
1. Install SGLang
Install the kvcache-ai fork of SGLang (required for kt-kernel support):
# Option A: One-click install (from ktransformers root, installs sglang + kt-kernel)
./install.sh

# Option B: pip install
pip install kt-kernel sglang-kt

# Option C: From source (editable mode)
git clone --recursive https://github.com/kvcache-ai/ktransformers.git
cd ktransformers
pip install -e "third_party/sglang/python[all]"
Important: Use
sglang-kt(kvcache-ai fork), not the officialsglangpackage. If you have the official version installed, uninstall it first:pip uninstall sglang -y
2. Prepare Weights
You need both GPU weights and CPU-side expert weights for heterogeneous inference. The exact format depends on the backend:
GPU Weights (for all backends):
Use the model weights required by SGLang for GPU inference (for example, the original or already-quantized model directory from Hugging Face).
CPU Weights (AMX backend: AMXINT4 / AMXINT8):
Quantize weights to AMX-optimized INT4/INT8 format using the provided script:
python scripts/convert_cpu_weights.py \
  --input-path /path/to/model \
  --input-type bf16 \
  --output /path/to/cpu-weights \
  --quant-method int8  # or int4 or moe_int8 (for amd now)
--input-path: Path to GPU-side original weights--input-type: Depends on your GPU weights type (fp8,fp16, orbf16)
In SGLang integration, --kt-weight-path should point to this converted CPU weights directory.
Supported input formats: FP8, FP16, BF16 → INT4/INT8.
CPU Weights (LLAMAFILE backend: LLAMAFILE):
LLAMAFILE uses pre-quantized GGUF weights on the CPU side directly, without running convert_cpu_weights.py. You need to:
- Download a GGUF model directly from the web (e.g., GGUF repos on Hugging Face / Modelscope);
- In SGLang integration, use that GGUF directory as
--kt-weight-path. KT-Kernel supports multiple GGUF quantization formats such asQ4_KM,Q4_K,Q5_K, etc. Choose based on your latency and accuracy requirements.
3. Launch SGLang Server
Start the SGLang server with your normal SGLang parameters, and add the following KT-Kernel specific parameters to enable CPU-GPU heterogeneous inference:
KT-Kernel Parameters to Add:
--kt-method: Backend method (AMXINT4, AMXINT8, or LLAMAFILE)--kt-weight-path: Path to the converted CPU weights--kt-cpuinfer: Number of CPU inference threads (set to physical cores)--kt-threadpool-count: Number of thread pools (set to NUMA node count)--kt-num-gpu-experts: Number of experts to keep on GPU--kt-max-deferred-experts-per-token: Deferred experts for pipelined execution
Example:
python -m sglang.launch_server \
  [your normal SGLang parameters...] \
  --kt-method AMXINT8 \
  --kt-weight-path /path/to/cpu-weights \
  --kt-cpuinfer 64 \
  --kt-threadpool-count 2 \
  --kt-num-gpu-experts 32 \
  --kt-max-deferred-experts-per-token 2
See KT-Kernel Parameters section below for detailed parameter tuning guidelines.
Complete Example: Qwen3-30B-A3B
This example demonstrates the full workflow from downloading weights to launching the server, showing Native backend, AMX backend and LLAMAFILE backend options.
Hardware Configuration:
- GPU: NVIDIA RTX 4090 24GB
- CPU: 2x Intel Xeon Gold 6454S (64 physical cores total, 128 threads, 2 NUMA nodes)
- Model: Qwen3-30B-A3B
How to verify your system configuration:
# Check CPU configuration
lscpu | grep -E "^CPU\(s\)|Thread\(s\) per core|Socket\(s\)|NUMA node\(s\)"
# Expected output example:
CPU(s):                                  128
Thread(s) per core:                      2
Socket(s):                               2
NUMA node(s):                            2
# → Physical cores = CPU(s) / Thread(s) per core = 128 / 2 = 64
Parameter Rationale:
--kt-cpuinfer 64: Set to physical cores (64), not hyperthreads (128)--kt-threadpool-count 2: 2 NUMA nodes detected (dual-socket system)--kt-num-gpu-experts 32: With 24GB GPU memory, we can fit ~32 experts on GPU for this model (varies by model architecture and actual memory usage)--kt-max-deferred-experts-per-token 2: Enable pipelined execution; allows CPU to process next batch while GPU completes current batch--kt-gpu-prefill-token-threshold 2048: Use layerwise prefill strategy when token count exceeds 2048 (for native backends only)
Option A: Native Backend (BF16)
For AVX512 CPUs with BF16 support.
Step 1: Download model weights
# Install huggingface-cli if not already installed
pip install huggingface-hub
# Download model from Hugging Face
huggingface-cli download Qwen/Qwen3-30B-A3B --local-dir /mnt/data/models/Qwen3-30B-A3B
Step 2: Launch SGLang server
python -m sglang.launch_server \
    --host 0.0.0.0 \
    --port 30000 \
    --model /mnt/data/models/Qwen3-30B-A3B \
    --kt-weight-path /mnt/data/models/Qwen3-30B-A3B \
    --kt-cpuinfer 64 \
    --kt-threadpool-count 2 \
    --kt-num-gpu-experts 32 \
    --kt-method BF16 \
    --attention-backend flashinfer \
    --trust-remote-code \
    --mem-fraction-static 0.80 \
    --chunked-prefill-size 16384 \
    --max-running-requests 4 \
    --served-model-name Qwen3 \
    --enable-mixed-chunk \
    --tensor-parallel-size 1 \
    --enable-p2p-check \
    --disable-shared-experts-fusion \
    --kt-gpu-prefill-token-threshold 4096 \
    --kt-enable-dynamic-expert-update
Option B: AMX Backend (AMXINT8)
For Intel CPUs with AMX instruction set support.
Step 1: Download model weights
# Install huggingface-cli if not already installed
pip install huggingface-hub

# Download model from Hugging Face
huggingface-cli download Qwen/Qwen3-30B-A3B --local-dir /mnt/data/models/Qwen3-30B-A3B
Step 2: Convert to CPU weights (AMXINT8)
python scripts/convert_cpu_weights.py \
  --input-path /mnt/data/models/Qwen3-30B-A3B \
  --input-type bf16 \
  --output /mnt/data/models/Qwen3-30B-A3B-INT8 \
  --quant-method int8
Step 3: Launch SGLang server
python -m sglang.launch_server \
  --host 0.0.0.0 \
  --port 8000 \
  --model /mnt/data/models/Qwen3-30B-A3B \
  --trust-remote-code \
  --mem-fraction-static 0.92 \
  --chunked-prefill-size 4096 \
  --served-model-name Qwen3-30B-A3B \
  --enable-mixed-chunk \
  --kt-method AMXINT8 \
  --kt-weight-path /mnt/data/models/Qwen3-30B-A3B-INT8 \
  --kt-cpuinfer 64 \
  --kt-threadpool-count 2 \
  --kt-num-gpu-experts 32 \
  --kt-max-deferred-experts-per-token 2
Option C: LLAMAFILE Backend (GGUF)
For universal CPUs (no AMX required), using pre-quantized GGUF weights directly.
Step 1: Download GPU weights (original model)
pip install huggingface-hub

huggingface-cli download Qwen/Qwen3-30B-A3B --local-dir /mnt/data/models/Qwen3-30B-A3B
Step 2: Download CPU weights (GGUF format)
huggingface-cli download Qwen/Qwen3-30B-A3B-GGUF Qwen3-30B-A3B-Q4_K_M.gguf \
  --local-dir /mnt/data/models/Qwen3-30B-A3B-Q4_K_M
Step 3: Launch SGLang server
python -m sglang.launch_server \
  --host 0.0.0.0 \
  --port 8000 \
  --model /mnt/data/models/Qwen3-30B-A3B \
  --trust-remote-code \
  --mem-fraction-static 0.92 \
  --chunked-prefill-size 4096 \
  --served-model-name Qwen3-30B-A3B \
  --enable-mixed-chunk \
  --kt-method LLAMAFILE \
  --kt-weight-path /mnt/data/models/Qwen3-30B-A3B-Q4_K_M \
  --kt-cpuinfer 64 \
  --kt-threadpool-count 2 \
  --kt-num-gpu-experts 32 \
  --kt-max-deferred-experts-per-token 2
KT-Kernel Parameters
| Parameter | Description | Example Value |
|---|---|---|
--kt-method | CPU inference backend method | AMXINT4, AMXINT8, RAWINT4, FP8, FP8_PERCHANNEL, BF16 or LLAMAFILE |
--kt-weight-path | Path to quantized CPU weights | /path/to/cpu-weights |
--kt-cpuinfer | Number of CPU inference threads | 64 (adjust based on CPU cores) |
--kt-threadpool-count | Number of thread pools for parallel execution | 2 (typically 1-4) |
--kt-num-gpu-experts | Number of experts to keep on GPU | 32 (remaining experts go to CPU) |
--kt-max-deferred-experts-per-token | Number of experts per token to defer for pipelined execution | 2 (0 to disable, 1-4 recommended) |
--kt-gpu-prefill-token-threshold | Token count threshold for prefill strategy (native backend only) | ~1024-4096 |
--kt-enable-dynamic-expert-update | Enable dynamic expert placement updates during prefill based on actual routing statistics | (flag, no value needed) |
--kt-expert-placement-strategy | Strategy for initial GPU expert placement | uniform, frequency, front-loading, or random |
Parameter Guidelines:
-
kt-method: Choose based on your CPU and weight format:AMXINT4: Best performance on AMX CPUs with INT4 quantized weights (May cause huge accuracy drop for some models, e.g., Qwen3-30B-A3B)AMXINT8: Higher accuracy with INT8 quantized weights on AMX CPUsRAWINT4: Native INT4 weights shared by CPU and GPU (currently supports Kimi-K2-Thinking model). See Kimi-K2-Thinking Native Tutorial for details.FP8,FP8_PERCHANNEL: FP8 weights shared by CPU and GPUBF16: BF16 weights shared by CPU and GPULLAMAFILE: GGUF-based backend
-
kt-cpuinfer: Set to the number of physical CPU cores (not hyperthreads).- Check physical cores:
lscpu | grep -E "^CPU\(s\)|Thread\(s\) per core" - Physical cores = CPU(s) / Thread(s) per core
- Example: If CPU(s)=128 and Thread(s) per core=2, then physical cores = 64
- Important: Do NOT set to hyperthread count - this will degrade performance
- Check physical cores:
-
kt-threadpool-count: Set to the number of NUMA nodes.- Check NUMA count:
lscpu | grep "NUMA node(s)" - Or use:
numactl --hardware | grep "available" - Note: NUMA node count is NOT necessarily the number of physical CPUs
- It represents memory domains, which may be divided within a single CPU or across multiple CPUs
- Use the NUMA node count from
lscpu, regardless of physical CPU count
- Typical values: 1-2 for single-socket, 2-4 for dual-socket systems
- This enables better memory bandwidth utilization across NUMA domains
- Check NUMA count:
-
kt-num-gpu-experts: Determine based on GPU memory and profiling:- More GPU experts = lower latency but higher GPU memory usage (May cause OOM)
-
kt-max-deferred-experts-per-token: Enables pipelined execution:0: Synchronous execution (simpler, higher latency)1-4: Deferred execution (recommended range; good latency/quality balance, requires tuning)5-7: Highest latency reduction but may introduce noticeable accuracy loss; use with care
-
kt-gpu-prefill-token-threshold(FP8 and RAWINT4 only): Controls prefill strategy for native FP8 and INT4 inference:- ≤ threshold: Uses hybrid CPU+GPU prefill. No extra VRAM needed, but performance degrades slowly as token count increases.
- > threshold: Uses layerwise GPU prefill. Performance scales better with longer sequences, but requires one MoE layer extra VRAM (e.g., ~9GB+ for Kimi-K2-Thinking and ~3.6GB for MiniMax-M2.1).
- Only applicable when
--kt-method RAWINT4or--kt-method FP8is used.
-
kt-enable-dynamic-expert-update: Enables dynamic expert placement updates during inference.- During layerwise prefill, the system collects actual routing statistics and redistributes GPU experts accordingly.
- Requires
--kt-gpu-prefill-token-thresholdto be set, and prefill length must be ≥ the threshold value. - Particularly effective at lower GPU expert ratios (10%-70%), where it can significantly outperform static strategies.
- See Expert Scheduling Tutorial for benchmarks and details.
-
kt-expert-placement-strategy: Determines which experts are placed on GPU at server startup.uniform: Distributes GPU experts evenly across all MoE layers. Default option, no prior statistics needed.frequency: Places the most frequently activated experts on GPU. Best performance when activation statistics are available; requires--init-expert-locationpointing to a.ptstatistics file.front-loading: Fills GPU experts from the first MoE layer onwards.random: Randomly selects experts with a fixed seed (42).- See Expert Scheduling Tutorial for strategy comparison.
Direct Python API Usage
For standalone usage without SGLang, you can use KT-Kernel directly via Python API:
from kt_kernel import KTMoEWrapper

# Initialize the MoE wrapper
wrapper = KTMoEWrapper(
    layer_idx=0,
    num_experts=8,
    num_experts_per_tok=2,
    hidden_size=4096,
    moe_intermediate_size=14336,
    num_gpu_experts=2,
    cpuinfer_threads=32,
    threadpool_count=2,
    weight_path="/path/to/weights",
    chunked_prefill_size=512,
    method="AMXINT4"  # Options: "AMXINT4", "AMXINT8", "LLAMAFILE"
)

# Load weights (from disk - pre-quantized)
wrapper.load_weights(physical_to_logical_map)

# Or load weights from tensors (online quantization)
wrapper.load_weights_from_tensors(gate_proj, up_proj, down_proj, physical_to_logical_map)

# Run inference
output = wrapper.forward(hidden_states, topk_ids, topk_weights, cuda_stream)

# Or use async API for better performance
wrapper.submit_forward(hidden_states, topk_ids, topk_weights, cuda_stream)
# ... do other work ...
output = wrapper.sync_forward(hidden_states, cuda_stream)
Advanced Options
# Initialize with additional options
wrapper = KTMoEWrapper(
    layer_idx=0,
    num_experts=8,
    num_experts_per_tok=2,
    hidden_size=4096,
    moe_intermediate_size=14336,
    num_gpu_experts=2,
    cpuinfer_threads=32,
    threadpool_count=2,
    weight_path="/path/to/weights",
    chunked_prefill_size=512,
    method="AMXINT4",
    cpu_save=False,  # Keep weights in CPU memory after loading
    max_deferred_experts_per_token=0  # Number of experts to defer (for pipelined execution)
)

# Pre-allocate buffers for specific batch sizes (improves performance)
KTMoEWrapper.set_capture_batch_sizes([1, 2, 4, 8, 16])

# Query captured batch sizes
batch_sizes = KTMoEWrapper.get_capture_batch_sizes()

# Clear buffer cache to free memory
KTMoEWrapper.clear_buffer_cache()
Manual Configuration (Advanced)
For portable builds, binary distribution, or cross-machine deployment, you need to manually specify target instruction sets:
# General distribution (works on any AVX512 CPU from 2017+)
export CPUINFER_CPU_INSTRUCT=AVX512
export CPUINFER_ENABLE_AMX=OFF
./install.sh build --manual

# Maximum compatibility (works on any CPU from 2013+)
export CPUINFER_CPU_INSTRUCT=AVX2
export CPUINFER_ENABLE_AMX=OFF
./install.sh build --manual

# Modern CPUs only (Ice Lake+, Zen 4+)
export CPUINFER_CPU_INSTRUCT=FANCY
export CPUINFER_ENABLE_AMX=OFF
./install.sh build --manual
Optional: Override VNNI/BF16 detection
# Force enable/disable VNNI and BF16 (for testing fallbacks)
export CPUINFER_ENABLE_AVX512_VNNI=OFF
export CPUINFER_ENABLE_AVX512_BF16=OFF
./install.sh
See ./install.sh --help for all available options.
Build Configuration
Manual Installation (Without install.sh)
If you prefer manual installation without the install.sh script:
1. Install System Dependencies
Prerequisites:
cmake(recommended:conda install -y cmake)libhwloc-devandpkg-config
2. Set Build Configuration
Core Options:
| Variable | Options | Description |
|---|---|---|
CPUINFER_CPU_INSTRUCT | NATIVE, AVX512, AVX2, FANCY | CPU instruction set to use |
CPUINFER_ENABLE_AMX | ON, OFF | Enable Intel AMX support |
CPUINFER_BUILD_TYPE | Release, Debug, RelWithDebInfo | Build type (default: Release) |
CPUINFER_PARALLEL | Number | Parallel build jobs (default: auto-detect) |
CPUINFER_VERBOSE | 0, 1 | Verbose build output (default: 0) |
Instruction Set Details:
| Option | Target CPUs | Use Case |
|---|---|---|
NATIVE | Your specific CPU only | Local builds (best performance, default) |
AVX512 | Skylake-X, Ice Lake, Cascade Lake, Zen 4+ | General distribution |
AVX2 | Haswell (2013) and newer | Maximum compatibility |
FANCY | Ice Lake+, Zen 4+ | Modern CPUs with full AVX512 extensions |
Example Configurations:
# Local use - maximum performance (default behavior)
export CPUINFER_CPU_INSTRUCT=NATIVE
export CPUINFER_ENABLE_AMX=ON  # or OFF

# Distribution build - works on any AVX512 CPU
export CPUINFER_CPU_INSTRUCT=AVX512
export CPUINFER_ENABLE_AMX=OFF

# Maximum compatibility - works on CPUs since 2013
export CPUINFER_CPU_INSTRUCT=AVX2
export CPUINFER_ENABLE_AMX=OFF

# Debug build
export CPUINFER_BUILD_TYPE=Debug
export CPUINFER_VERBOSE=1
3. Build and Install
# Editable installation (for development)
pip install -e .

# Standard installation
pip install .
Error Troubleshooting
CUDA Not Found
 -- Looking for a CUDA compiler - NOTFOUND
  CMake Error at CMakeLists.txt:389 (message):
    KTRANSFORMERS_USE_CUDA=ON but CUDA compiler not found
Make sure you have the CUDA toolkit installed and nvcc is in your system PATH.
Try export CMAKE_ARGS="-D CMAKE_CUDA_COMPILER=$(which nvcc)" and reinstall again.
hwloc Not Found
Run sudo apt install libhwloc-dev if on a Debian-based system or build from source: https://www.open-mpi.org/projects/hwloc/.
wget https://download.open-mpi.org/release/hwloc/v2.12/hwloc-2.12.2.tar.gz
tar -xzf hwloc-2.12.2.tar.gz
cd hwloc-2.12.2
./configure
make
sudo make install
Weight Quantization
For AMX backends (AMXINT4 / AMXINT8), CPU-side experts must be converted to AMX-friendly INT4/INT8 format using the provided script:
python scripts/convert_cpu_weights.py \
  --input-path /path/to/model \
  --input-type bf16 \
  --output /path/to/output \
  --quant-method int4
Supported formats: FP8, FP16, BF16 → INT4/INT8
For LLAMAFILE backend (LLAMAFILE), CPU-side experts are loaded directly from GGUF weights. You do not need to run the AMX conversion script; instead, download a GGUF model from the web (e.g., a GGUF repo on Hugging Face) and point weight_path / SGLang --kt-weight-path (or --model when appropriate) to that GGUF directory. KT-Kernel supports multiple GGUF quantization types such as Q4_KM, Q4_K, Q5_K, etc.
For detailed documentation, advanced options, and low-memory mode, see scripts/README.md.
Before Commit!
Commit messages should follow the Conventional Commits specification: https://www.conventionalcommits.org/
Please format your code before committing:
cmake -B build
cd build
make format
You may need a newer clang-format (at least version 18). In a conda environment:
conda install -c conda-forge clang-format=18
rm -rf build
It’s also recommended to install black for Python code formatting:
conda install black
KTransformers Fine-Tuning × LLaMA-Factory Integration – User Guide
MadSys Lab, KVCache-AI Team, Approaching AI, LLaMA-Factory Team
Introduction
From DeepSeek-V3/R1 to Qwen3-MoE and Kimi-K2, each wave of open-sourced large models brings leaps in performance and scale. However, many researchers and developers are constrained by expensive GPUs and models with tens or even hundreds of billions of parameters, making it hard to fine-tune very large models under limited resources. To bridge this gap, we propose a practical approach: combining KTransformers with LLaMA-Factory. With just 2–4 RTX 4090s and a high-memory CPU, you can fine-tune ultra-large MoE models like DeepSeek-671B.
Our goal is to give resource-constrained researchers a local path to explore fine-tuning ultra-large models, and also a fast way to customize smaller models (e.g., 14B/30B) for specific scenarios. We validate the setup using stylized dialogue, Westernized translation tone, and medical Q&A as representative tasks, showing that personalized adaptation can be achieved within hours.
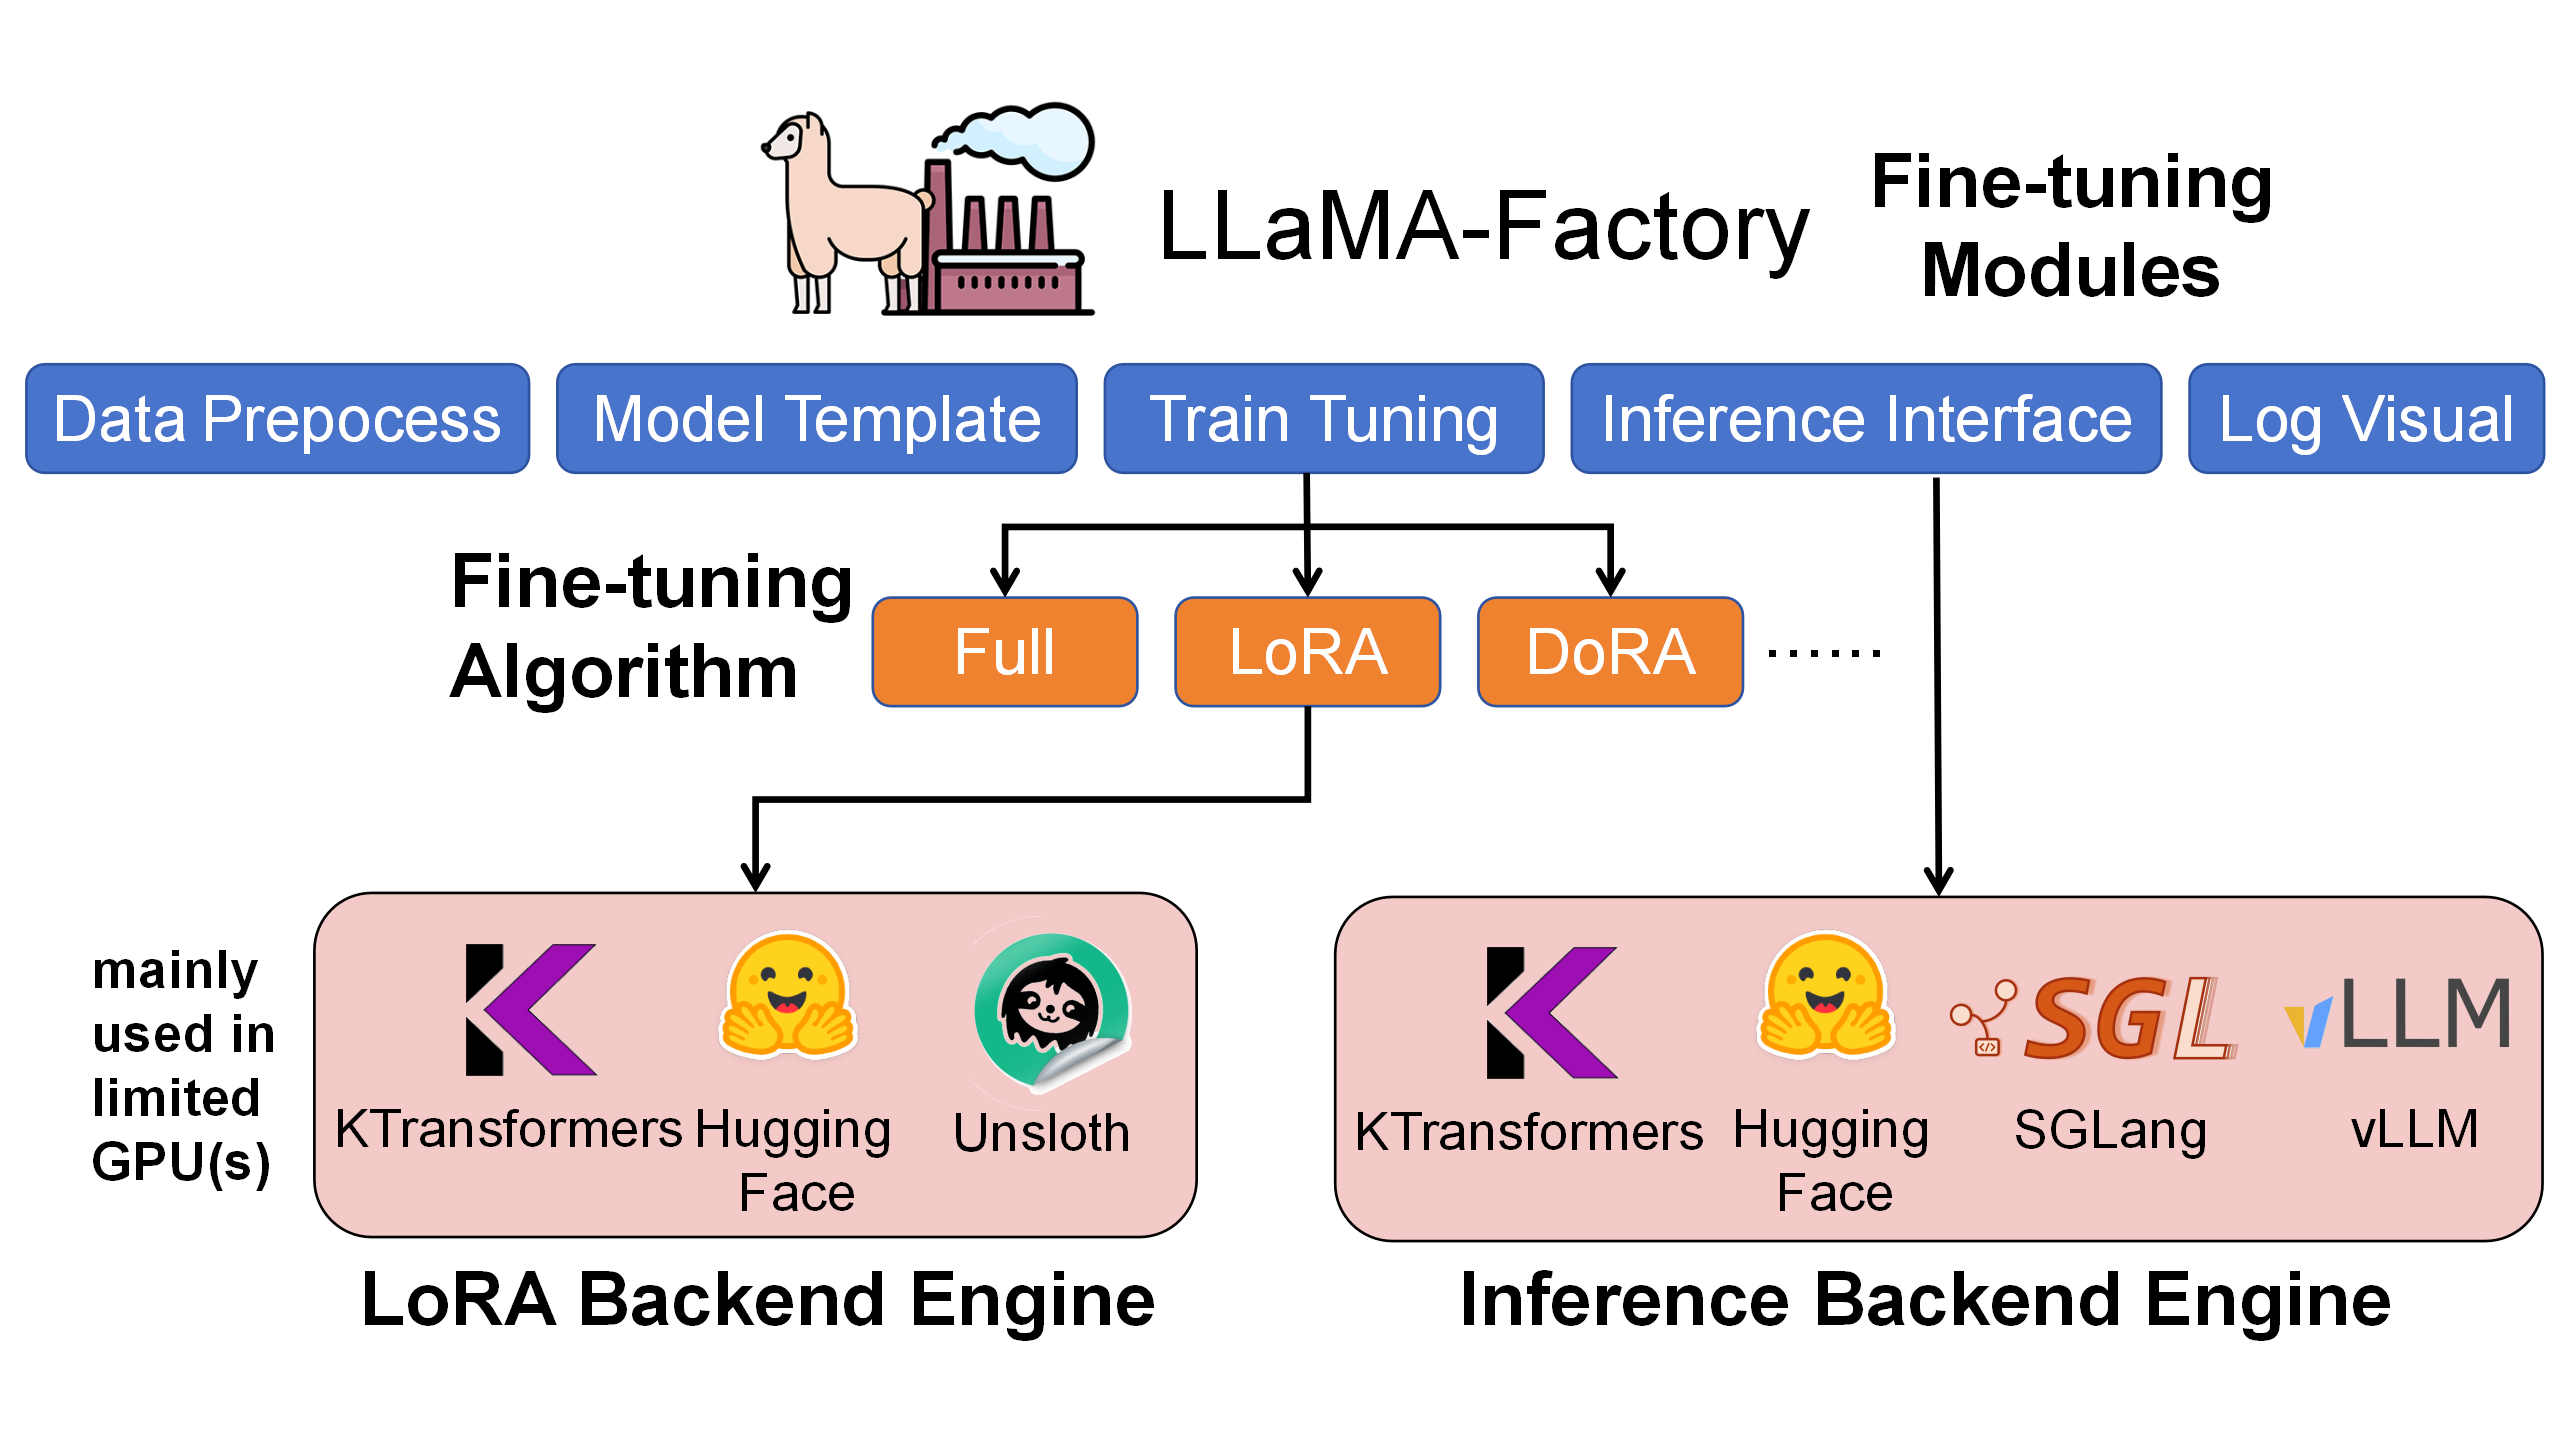
As shown below, LLaMA-Factory is the unified orchestration/configuration layer for the whole fine-tuning workflow—handling data, training scheduling, LoRA injection, and inference interfaces. KTransformers acts as a pluggable high-performance backend that takes over core operators like Attention/MoE under the same training configs, enabling efficient GPU+CPU heterogeneous cooperation.

Within LLaMA-Factory, we compared LoRA fine-tuning with HuggingFace, Unsloth, and KTransformers backends. KTransformers is the only workable 4090-class solution for ultra-large MoE models (e.g., 671B) and also delivers higher throughput and lower GPU memory on smaller MoE models (e.g., DeepSeek-14B).
| Under LoRA (BF16) + NekoQA-10K stylized dialogue | HuggingFace Backend | Unsloth Backend | KTransformers Backend |
|---|---|---|---|
| [14B-DeepSeekV2-Lite] LoRA fine-tuning throughput | 303.58 token/s | 455.37 token/s | 530.38 token/s |
| [14B-DeepSeekV2-Lite] GPU memory | 32.12 GB | 9.64 GB | 6.08 GB |
| [671B-DeepSeekV3] LoRA fine-tuning throughput | Too Huge to run | NOT SUPPORT | 40.35 token/s |
| [671B-DeepSeekV3] GPU memory (sum across GPUs) | theoretical 1400 GB † | NOT SUPPORT | 70 GB † |
† 1400 GB is a theoretical FP16 full-parameter resident footprint (not runnable). 70 GB is the measured peak with KT strategy (Attention on GPU + layered MoE offload).

Fine-Tuning Results (Examples)
Stylized Dialogue (CatGirl tone)
Dataset: NekoQA-10K. Goal: improve style consistency and recognizability.
The figure compares responses from the base vs. fine-tuned models. The fine-tuned model maintains the target tone and address terms more consistently (red boxes), validating the effectiveness of style-transfer fine-tuning.

Benchmarks
We use:
(1) Translational-Style-ChatLLM, which asks for an exaggerated, Westernized translation tone—clear, stylized customization.
(2) AfriMed-QA (ACL 2025), a medical dataset for African contexts with strong domain specificity, including multiple-choice and short-answer sub-tasks—well-suited for vertical fine-tuning evaluation.
The tables show metrics before vs. after LoRA fine-tuning. We observe large improvements across metrics, verifying fine-tuning effectiveness:
| Translational-Style dataset | BLEU-1 | BLEU-2 | BLEU-3 | BLEU-4 | ROUGE-1 | ROUGE-2 | ROUGE-L |
|---|---|---|---|---|---|---|---|
| V2-Lite (no LoRA) | 20.66 | 8.33 | 4.54 | 2.89 | 22.71 | 4.52 | 19.19 |
| KT-LoRA fine-tuned V2-Lite | 35.41 | 22.44 | 15.42 | 11.18 | 42.03 | 18.38 | 33.10 |
| V3 base (no LoRA) | 8.49 | 3.34 | 1.62 | 0.96 | 15.91 | 2.55 | 10.07 |
| KT-LoRA fine-tuned V3 | 37.02 | 23.70 | 16.21 | 11.49 | 43.43 | 18.96 | 34.54 |
| AfriMed-QA (short answer) | BLEU-1 | BLEU-2 | BLEU-3 | BLEU-4 | ROUGE-1 | ROUGE-2 | ROUGE-L |
|---|---|---|---|---|---|---|---|
| V2-Lite (no LoRA) | 13.58 | 11.12 | 9.10 | 7.23 | 22.48 | 7.81 | 11.73 |
| KT-LoRA fine-tuned V2-Lite | 35.90 | 27.63 | 22.99 | 19.15 | 35.25 | 17.50 | 28.44 |
| V3 base (no LoRA) | 12.75 | 10.27 | 8.05 | 5.99 | 20.33 | 5.65 | 10.11 |
| KT-LoRA fine-tuned V3 | 42.42 | 34.12 | 28.95 | 24.54 | 41.97 | 22.37 | 33.28 |
| AfriMed-QA (multiple choice) | Accuracy |
|---|---|
| V2-Lite (no LoRA) | 0.0645 |
| KT-LoRA fine-tuned V2-Lite | 0.4812 |
| V3 base (no LoRA) | 0.5833 |
| KT-LoRA fine-tuned V3 | 0.7930 |
Even for ultra-large MoE models, KTransformers-backed fine-tuning achieves strong task performance quickly.
Quick to Start
This section shows how to install and use LLaMA-Factory + KTransformers for fine-tuning and inference:
- Environment setup
- Fine-tune ultra-large MoE models with KTransformers backend
- Load the fine-tuned model (base + LoRA adapter) for chat/inference
- Batch inference and metric evaluation
Environment Setup
According to the following example, install both the KTransformers and LLaMA-Factory environments simultaneously. This time, to simplify the installation process of KTransformers, use the PyPI packages to avoid local compilation. The detailed installation steps are as follows: (Note: Make sure your local Python version, Torch version, and CUDA version are compatible with the installed packages.)
# 1. Create a conda environment
conda create -n Kllama python=3.12 # choose from : [3.11, 3.12, 3.13]
conda install -y -c conda-forge libstdcxx-ng gcc_impl_linux-64
conda install -y -c nvidia/label/cuda-11.8.0 cuda-runtime

# 2. Install the LLaMA-Factory environment
git clone --depth 1 https://github.com/hiyouga/LLaMA-Factory.git
cd LLaMA-Factory
pip install -e .

# 3. Install the KTransformers SFT packages
pip install "ktransformers[sft]"

# 4. Install flash-attention, download the corresponding file based on your Python and Torch versions from: https://github.com/Dao-AILab/flash-attention/releases
pip install flash-attn --no-build-isolation
# abi=True/False can find from below
# import torch
# print(torch._C._GLIBCXX_USE_CXX11_ABI)

# 5. (Optional) If you want to use flash_infer (otherwise it defaults to triton)
git clone https://github.com/kvcache-ai/custom_flashinfer.git
pip install custom_flashinfer/
Usage tip: In LLaMA-Factory YAML, set use_kt: true and pick a kt_optimize_rule file to have KTransformers handle the core compute. The features below show typical configs.
Core Feature 1: Use KTransformers backend to fine-tune ultra-large MoE models
Run the command: USE_KT=1 ACCELERATE_USE_KT=true accelerate launch --config_file examples/ktransformers/accelerate/fsdp2_kt_bf16.yaml -m llamafactory.cli train examples/ktransformers/train_lora/deepseek_v3_lora_sft_kt.yaml.
Note: You must provide a BF16 model. DeepSeek-V3-671B is released in FP8 by default; convert with DeepSeek-V3/inference/fp8_cast_bf16.py.
### model
model_name_or_path: opensourcerelease/DeepSeek-V3-bf16
trust_remote_code: true

### method
stage: sft
do_train: true
finetuning_type: lora
lora_rank: 8
lora_target: all

### dataset
dataset: identity
template: deepseek
cutoff_len: 2048
max_samples: 100000
overwrite_cache: true
preprocessing_num_workers: 16
dataloader_num_workers: 4

### output
output_dir: saves/Kllama_deepseekV3
logging_steps: 10
save_steps: 500
plot_loss: true
overwrite_output_dir: true
save_only_model: false
report_to: none  # choices: [none, wandb, tensorboard, swanlab, mlflow]

### train
per_device_train_batch_size: 1
gradient_accumulation_steps: 8
learning_rate: 1.0e-4
num_train_epochs: 3.0
lr_scheduler_type: cosine
warmup_ratio: 0.1
bf16: true
ddp_timeout: 180000000
resume_from_checkpoint: null

### ktransformers
use_kt: true # use KTransformers as LoRA sft backend
kt_optimize_rule: examples/kt_optimize_rules/DeepSeek-V3-Chat-sft-amx-multi-gpu.yaml
cpu_infer: 32
chunk_size: 8192
kt_optimize_rule controls placement strategy. See also ktransformers/optimize_rules. Naming hints (* = wildcard):
| Pattern | Meaning |
|---|---|
| DeepSeek-V2-Lite-Chat-* / DeepSeek-V3-Chat-* | Target model variants |
| -sft- | Strategy for fine-tuning; others are for inference |
| -amx- | Use AMX on CPU; otherwise use llamafile |
| -multi-gpu-X | Model parallel on X GPUs (X omitted → default 2 GPUs) |
Example: DeepSeek-V3-Chat-sft-amx-multi-gpu.yaml = V3-Chat fine-tuning with AMX and 2-GPU model parallel.
We recommend AMX acceleration where available (lscpu | grep amx). AMX supports BF16/INT8. Example:
- match:
    name: "^model\\.layers\\..*\\.mlp\\.experts$"
  replace:
    class: ktransformers.operators.experts.KTransformersExperts     # custom MoE Kernel with expert parallelism
    kwargs:
      prefill_device: "cpu"
      prefill_op: "KExpertsTorch"
      generate_device: "cpu"
      generate_op: "KSFTExpertsCPU"
      out_device: "cuda"
      backend: "AMXInt8" # or "AMXBF16" or "llamafile" (default)
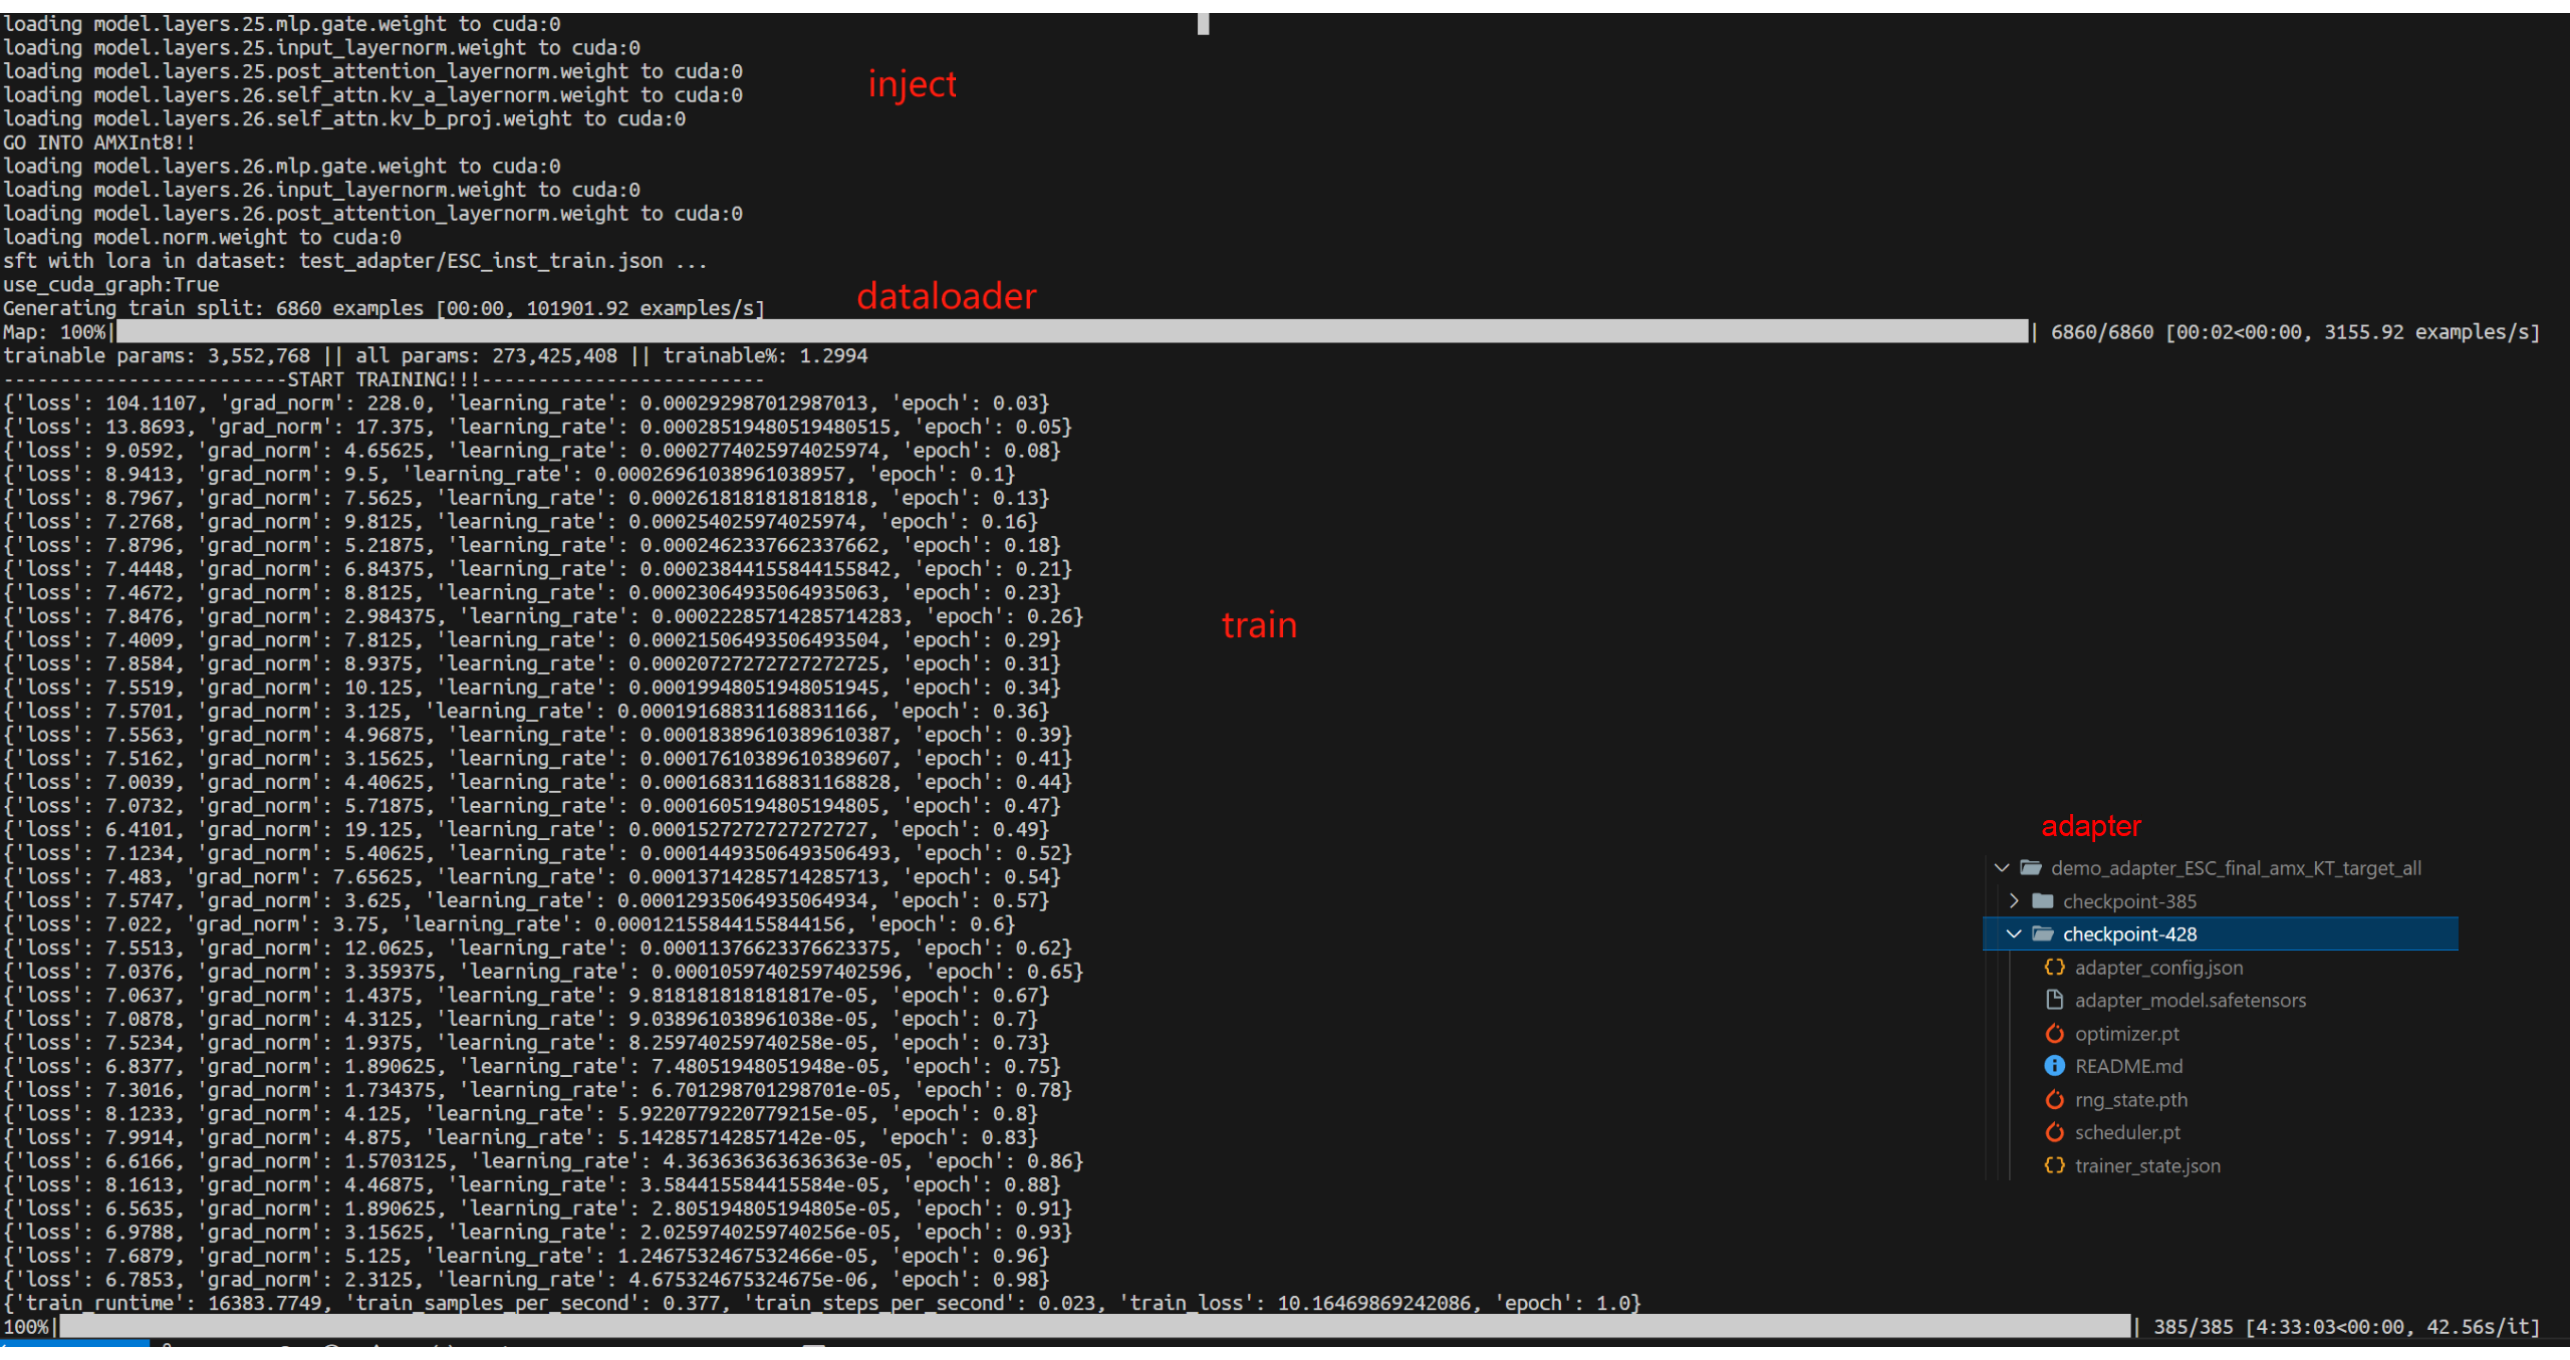
Outputs go to output_dir in safetensors format plus adapter metadata for later loading.
Core Feature 2: Chat with the fine-tuned model (base + LoRA adapter)
Run the command: llamafactory-cli chat examples/inference/qwen3_lora_sft.yaml.
Use the safetensors adapter trained with KT for inference.
model_name_or_path: opensourcerelease/DeepSeek-V3-bf16
adapter_name_or_path: saves/Kllama_deepseekV3
template: deepseek
infer_backend: ktransformers  # choices: [huggingface, vllm, sglang, ktransformers]
trust_remote_code: true

use_kt: true # use KTransformers as LoRA sft backend to inference
kt_optimize_rule: examples/kt_optimize_rules/DeepSeek-V3-Chat-sft-amx-multi-gpu.yaml
cpu_infer: 32
chunk_size: 8192
We also support GGUF adapters: for safetensors, set the directory; for GGUF, set the file path in adapter_name_or_path.
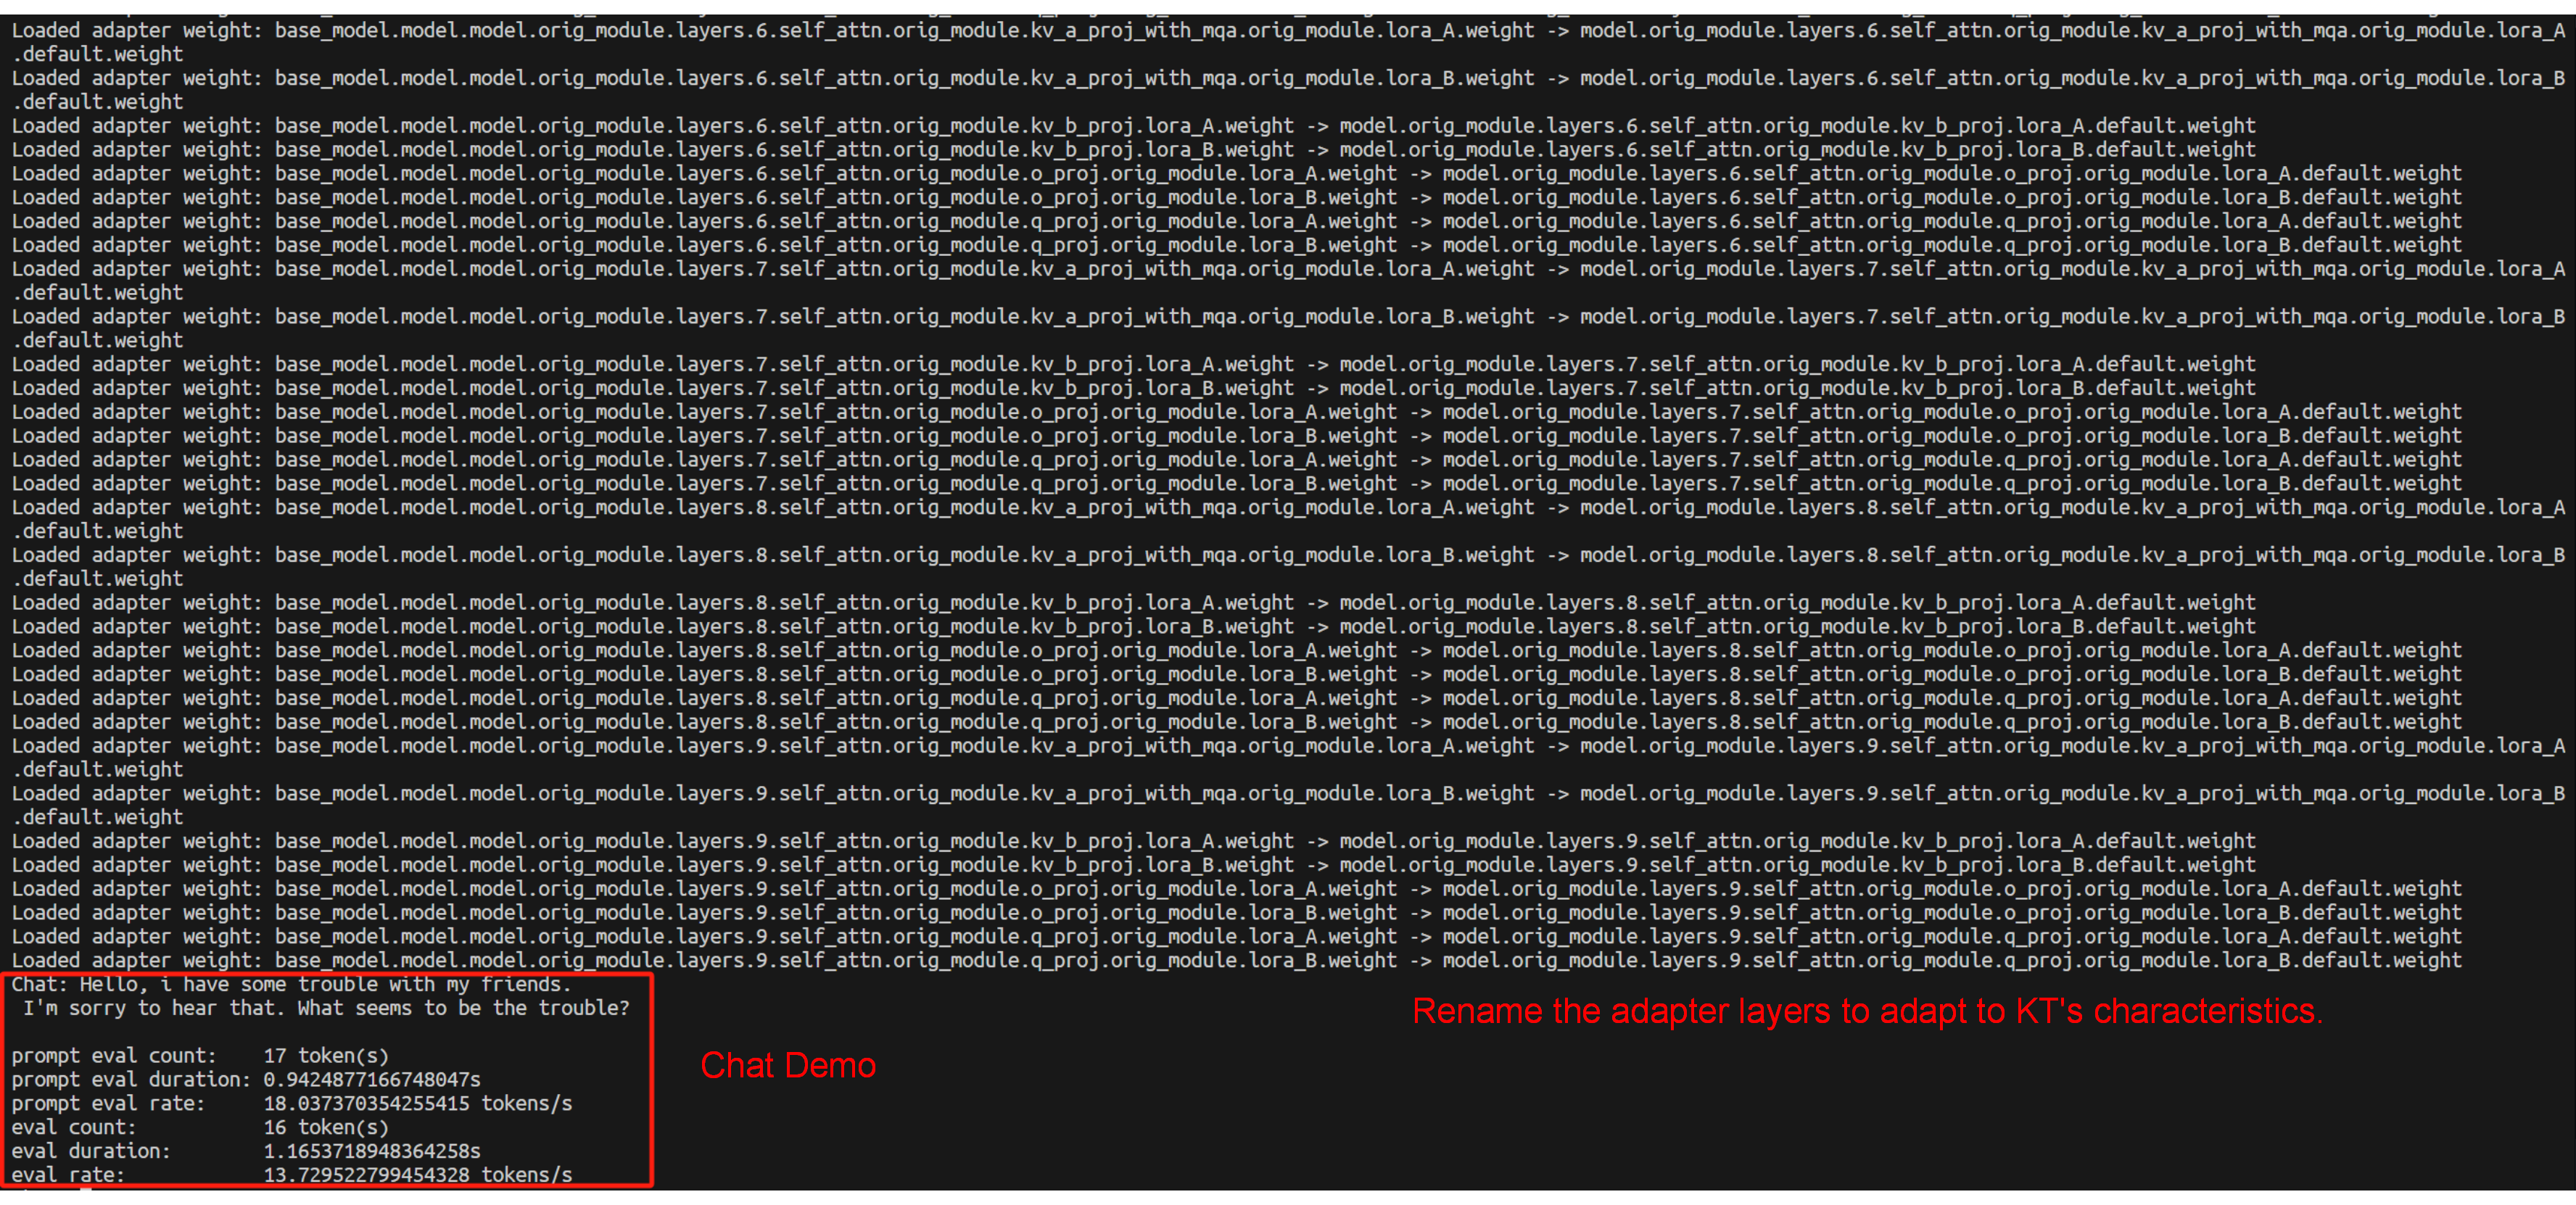
During loading, LLaMA-Factory maps layer names to KT’s naming. You’ll see logs like Loaded adapter weight: XXX -> XXX:
Core Feature 3: Batch inference + metrics (base + LoRA adapter)
Run the command: API_PORT=8000 llamafactory-cli api examples/inference/qwen3_lora_sft.yaml.
Invoke the KT fine-tuned adapter to provide the API; the usage logic of other APIs is consistent with the native LLaMA-Factory approach.
model_name_or_path: opensourcerelease/DeepSeek-V3-bf16
adapter_name_or_path: saves/Kllama_deepseekV3
template: deepseek
infer_backend: ktransformers  # choices: [huggingface, vllm, sglang, ktransformers]
trust_remote_code: true

use_kt: true # use KTransformers as LoRA sft backend to inference
kt_optimize_rule: examples/kt_optimize_rules/DeepSeek-V3-Chat-sft-amx-multi-gpu.yaml
cpu_infer: 32
chunk_size: 8192
KT Fine-Tuning Speed (User-Side View)
End-to-End Performance
Definitions
step_time: wall-clock time for a full optimization step (tensor movement + Attention + MoE + other compute).tokens_per_step = GAS × qlen;token/s = tokens_per_step / step_time.
Settings: GAS=16, qlen=512 (→ tokens_per_step = 8192); LoRA (r=8, alpha=32, dropout=0.1); AMX enabled; GPU: RTX 4090, CPU: Intel Xeon Platinum 8488C.
Measured
- DeepSeek-V3-671B:
step_time = 203 s→token/s ≈ 8192 / 203 ≈ 40.35 - DeepSeek-V2-Lite-14B:
step_time = 36 s→token/s ≈ 8192 / 36 ≈ 227.6
GPU/CPU Memory Footprint
- DeepSeek-V3 (671B; 61 layers with 58 MoE): ~70 GB total GPU VRAM (multi-GPU), ~1.2–1.3 TB CPU RAM.
- DeepSeek-V2-Lite (14B; 27 layers with 26 MoE): ~5.5 GB GPU VRAM, ~30 GB CPU RAM.
Conclusion
By integrating KTransformers LoRA fine-tuning into LLaMA-Factory, we provide a practical guide for efficient training and deployment of MoE LLMs. KT brings cutting-edge optimizations (DeepSeek/Qwen/Kimi support with AMX-accelerated kernels), and LoRA enables customization under very low GPU memory. LLaMA-Factory offers a friendly, unified interface.
This integration (akin to Unsloth-style speedups) means even models with tens to hundreds of billions of parameters can be fine-tuned and deployed with low latency on commodity hardware. You get memory savings, speed-ups, and usability together. We encourage you to try LLaMA-Factory + KT for your next MoE project and follow this guide. Feedback is welcome!
KTransformers SFT Docs
- v0.6.1 Quick Start
- Fine-Tuning User Guide
- KT-FT Fine-Tuning and Inference Loop
- Developer Technical Notes
- DPO Tutorial
- Injection Tutorial
KT-FT Fine-Tuning and Inference Loop
Last updated: 2026-06-01
This guide documents the current KT-FT loop for Qwen3.5 MoE: train with KT SFT, convert the output once, and serve the fine-tuned result through SGLang with a single merged adapter path.
KT SFT raw output
  -> convert_kt_to_sglang_adapter.py
  -> <MERGED_ADAPTER_DIR>
  -> sglang --lora-paths <name>=<MERGED_ADAPTER_DIR>
  -> server auto-splits expert / non-expert internally
  -> request model=<served_model>:<name>
Training-side KT SFT docs remain separate. This page focuses on the bridge from trained LoRA artifacts to online inference.
1. Scope
Current supported and validated workflow:
- Base model: Qwen3.5 MoE, for example
Qwen3.5-35B-A3B - KT expert weights: AMX/BF16 SFT-compatible KT CPU expert path
- User-facing serving input: one converted merged adapter directory
- Runtime split: expert LoRA goes to the KT CPU expert path; non-expert LoRA goes to SGLang’s LoRA manager. This split happens automatically at server startup.
2. Artifacts At Each Stage
Raw KT SFT output
After LLaMA-Factory + KT training, the output directory contains two LoRA artifacts:
<KT_SFT_OUTPUT_DIR>/
  adapter_model.safetensors      # non-expert LoRA
  fused_expert_lora.safetensors  # expert LoRA in KT fused format
  adapter_config.json
Do not pass this raw directory directly to SGLang serving.
Converted merged adapter
Run the converter once to produce the serving input:
<MERGED_ADAPTER_DIR>/
  adapter_config.json
  adapter_model.safetensors
This merged directory contains both expert and non-expert LoRA tensors in one PEFT-style adapter. Pass only this directory to --lora-paths.
3. Convert Once
python kt-kernel/scripts/convert_kt_to_sglang_adapter.py \
  <KT_SFT_OUTPUT_DIR> \
  <MERGED_ADAPTER_DIR> \
  --base-model-name-or-path /path/to/Qwen3.5-35B-A3B \
  --overwrite
Example:
python kt-kernel/scripts/convert_kt_to_sglang_adapter.py \
  saves/KT_FT_qwen35B_Moe_nekoqa_eod_240 \
  saves/KT_FT_qwen35B_Moe_nekoqa_eod_240_sglang \
  --base-model-name-or-path /mnt/data3/models/Qwen3.5-35B-A3B \
  --overwrite
The converter reads fused_expert_lora.safetensors and the existing non-expert adapter_model.safetensors, then writes one merged adapter directory.
Optional split outputs for debugging:
python kt-kernel/scripts/convert_kt_to_sglang_adapter.py \
  <KT_SFT_OUTPUT_DIR> \
  <MERGED_ADAPTER_DIR> \
  --base-model-name-or-path /path/to/Qwen3.5-35B-A3B \
  --expert-output-dir <EXPERT_ADAPTER_DIR> \
  --nonexpert-output-dir <NONEXPERT_ADAPTER_DIR> \
  --overwrite
For normal serving, only <MERGED_ADAPTER_DIR> is needed.
4. Launch SGLang
Use the KTransformers SGLang fork from this repository and point PYTHONPATH at both kt-kernel/python and third_party/sglang/python.
cd /path/to/ktransformers

PYTHONPATH=/path/to/ktransformers/kt-kernel/python:/path/to/ktransformers/third_party/sglang/python:$PYTHONPATH \
python -m sglang.launch_server \
  --host 127.0.0.1 \
  --port 30006 \
  --model-path /path/to/Qwen3.5-35B-A3B \
  --tokenizer-path /path/to/Qwen3.5-35B-A3B \
  --kt-weight-path /path/to/Qwen3.5-35B-A3B-AMXINT4 \
  --kt-method AMXINT4 \
  --kt-cpuinfer 60 \
  --kt-threadpool-count 2 \
  --kt-numa-nodes 0 1 \
  --kt-num-gpu-experts 0 \
  --attention-backend flashinfer \
  --trust-remote-code \
  --mem-fraction-static 0.98 \
  --chunked-prefill-size 4096 \
  --max-running-requests 2 \
  --max-total-tokens 32000 \
  --served-model-name qwen3.5-kt-ft \
  --enable-mixed-chunk \
  --tensor-parallel-size 4 \
  --enable-p2p-check \
  --disable-cuda-graph \
  --disable-custom-all-reduce \
  --enable-lora \
  --lora-backend triton \
  --lora-paths qwen35b_neko=/path/to/KT_FT_qwen35B_Moe_nekoqa_eod_240_sglang \
  --log-level info
Important points:
- Pass only one merged adapter through
--lora-paths. - Do not also pass
--kt-expert-lora-pathin the normal user workflow. - At startup, the server detects the merged KT MoE adapter, splits it internally, and writes runtime cache directories under
$TMPDIR/sglang_kt_lora_cache/(or$SGLANG_KT_LORA_CACHE_DIRif set). - Prefer
--lora-backend tritonfor Qwen3.5 full-LoRA generation.
Current constraints:
- single merged KT composite adapter only
--kt-num-gpu-experts 0- do not enable
--kt-enable-dynamic-expert-update - do not use
--kt-gpu-prefill-token-threshold - use an AMX/BF16 SFT-compatible KT method such as
AMXINT4,AMXINT8,AMXBF16, orBF16
5. Request Semantics
The OpenAI-compatible request model field uses names, not paths.
--served-model-name qwen3.5-kt-ft
--lora-paths qwen35b_neko=/path/to/merged_adapter
Request behavior in the current single-adapter implementation:
model=qwen3.5-kt-ft
=> base + KT expert LoRA

model=qwen3.5-kt-ft:qwen35b_neko
=> base + KT expert LoRA + SGLang non-expert LoRA
The suffix after : must match the left-side name in --lora-paths.
6. Smoke Test
curl -sS http://127.0.0.1:30006/v1/chat/completions \
  -H 'Content-Type: application/json' \
  -d '{
    "model": "qwen3.5-kt-ft:qwen35b_neko",
    "messages": [{"role": "user", "content": "我回来了,你在干嘛?"}],
    "temperature": 0.7,
    "max_tokens": 160,
    "chat_template_kwargs": {"enable_thinking": false}
  }'
Startup logs should include lines similar to:
Prepared merged KT LoRA adapter ... for runtime: expert=... nonexpert=...
Loaded KT expert LoRA for layer ...
Using triton as backend of LoRA kernels.
7. Advanced: Manual Split Serving
The older split-runtime contract is still available for debugging:
--kt-expert-lora-path <EXPERT_ADAPTER_DIR> \
--enable-lora \
--lora-paths <NONEXPERT_LORA_NAME>=<NONEXPERT_ADAPTER_DIR>
This is not the recommended user-facing path. Normal users should pass one merged adapter directory through --lora-paths only.
8. Troubleshooting
Got LoRA adapter that has never been loaded: lora0
The adapter name in the request must match the left side of --lora-paths. If you launched with qwen35b_neko=..., request model=qwen3.5-kt-ft:qwen35b_neko, not :lora0.
No visible adapter effect
Make sure you are serving the intended merged adapter directory. For example, use the Neko adapter at ..._nekoqa_eod_240_sglang, not a generic sanity adapter such as ..._Moe_sglang.
connection refused
Check that the server is listening on the port you curl, and remember the example above binds to 127.0.0.1, not 0.0.0.0.
Server resolves upstream SGLang instead of this checkout
python - <<'PY'
import inspect
import sglang.srt.models.qwen3_5 as qwen3_5
print(inspect.getfile(qwen3_5))
PY
The path should come from this repository’s third_party/sglang.
KT-FT 微调推理闭环
最后更新:2026-06-01
本文档描述当前 Qwen3.5 MoE 的 KT-FT 闭环:用 KT SFT 完成微调,转换一次输出,再通过 SGLang 用单个 merged adapter path 把微调结果服务化。
KT SFT 原始输出
  -> convert_kt_to_sglang_adapter.py
  -> <MERGED_ADAPTER_DIR>
  -> sglang --lora-paths <name>=<MERGED_ADAPTER_DIR>
  -> server 内部自动拆分 expert / non-expert
  -> 请求 model=<served_model>:<name>
训练侧 KT SFT 文档仍然独立维护;本文重点说明从已训练 LoRA artifacts 到在线推理的连接部分。
1. 范围
当前已验证路径:
- 基座模型:Qwen3.5 MoE,例如
Qwen3.5-35B-A3B - KT expert 权重:AMX/BF16 SFT 兼容的 KT CPU expert 路径
- 用户侧 serving 输入:一个 converted merged adapter 目录
- Runtime 内部仍会 split:expert LoRA 走 KT CPU expert path,non-expert LoRA 走 SGLang LoRA manager,但这一步对用户不可见
2. 各阶段产物
原始 KT SFT 输出
LLaMA-Factory + KT 训练完成后,输出目录里有两个 LoRA 文件:
<KT_SFT_OUTPUT_DIR>/
  adapter_model.safetensors      # non-expert LoRA
  fused_expert_lora.safetensors  # KT fused expert LoRA
  adapter_config.json
不要把 raw 训练目录直接传给 SGLang serving。
Convert 后的 merged adapter
converter 一次性生成 serving 输入:
<MERGED_ADAPTER_DIR>/
  adapter_config.json
  adapter_model.safetensors
这个 merged 目录同时包含 expert 和 non-expert LoRA。正常 serving 只需要传这一个目录。
3. 转换一次
python kt-kernel/scripts/convert_kt_to_sglang_adapter.py \
  <KT_SFT_OUTPUT_DIR> \
  <MERGED_ADAPTER_DIR> \
  --base-model-name-or-path /path/to/Qwen3.5-35B-A3B \
  --overwrite
示例:
python kt-kernel/scripts/convert_kt_to_sglang_adapter.py \
  saves/KT_FT_qwen35B_Moe_nekoqa_eod_240 \
  saves/KT_FT_qwen35B_Moe_nekoqa_eod_240_sglang \
  --base-model-name-or-path /mnt/data3/models/Qwen3.5-35B-A3B \
  --overwrite
converter 会读取 fused_expert_lora.safetensors 和已有的 non-expert adapter_model.safetensors,写出一个 merged adapter 目录。
如需调试,也可以额外输出 split 目录:
python kt-kernel/scripts/convert_kt_to_sglang_adapter.py \
  <KT_SFT_OUTPUT_DIR> \
  <MERGED_ADAPTER_DIR> \
  --base-model-name-or-path /path/to/Qwen3.5-35B-A3B \
  --expert-output-dir <EXPERT_ADAPTER_DIR> \
  --nonexpert-output-dir <NONEXPERT_ADAPTER_DIR> \
  --overwrite
正常 serving 只需要 <MERGED_ADAPTER_DIR>。
4. 启动 SGLang
请使用本仓库的 KTransformers SGLang fork,并把 PYTHONPATH 指向 kt-kernel/python 和 third_party/sglang/python。
cd /path/to/ktransformers

PYTHONPATH=/path/to/ktransformers/kt-kernel/python:/path/to/ktransformers/third_party/sglang/python:$PYTHONPATH \
python -m sglang.launch_server \
  --host 127.0.0.1 \
  --port 30006 \
  --model-path /path/to/Qwen3.5-35B-A3B \
  --tokenizer-path /path/to/Qwen3.5-35B-A3B \
  --kt-weight-path /path/to/Qwen3.5-35B-A3B-AMXINT4 \
  --kt-method AMXINT4 \
  --kt-cpuinfer 60 \
  --kt-threadpool-count 2 \
  --kt-numa-nodes 0 1 \
  --kt-num-gpu-experts 0 \
  --attention-backend flashinfer \
  --trust-remote-code \
  --mem-fraction-static 0.98 \
  --chunked-prefill-size 4096 \
  --max-running-requests 2 \
  --max-total-tokens 32000 \
  --served-model-name qwen3.5-kt-ft \
  --enable-mixed-chunk \
  --tensor-parallel-size 4 \
  --enable-p2p-check \
  --disable-cuda-graph \
  --disable-custom-all-reduce \
  --enable-lora \
  --lora-backend triton \
  --lora-paths qwen35b_neko=/path/to/KT_FT_qwen35B_Moe_nekoqa_eod_240_sglang \
  --log-level info
要点:
- 用户只需要传一个 merged adapter:
--lora-paths <name>=<MERGED_ADAPTER_DIR> - 正常 workflow 不要再额外传
--kt-expert-lora-path - server 启动时会自动识别 merged KT MoE adapter,并在
$TMPDIR/sglang_kt_lora_cache/(或$SGLANG_KT_LORA_CACHE_DIR)下生成 runtime cache - Qwen3.5 full LoRA 生成优先使用
--lora-backend triton
当前限制:
- 只支持单个 merged KT composite adapter
--kt-num-gpu-experts 0- 不启用
--kt-enable-dynamic-expert-update - 不使用
--kt-gpu-prefill-token-threshold - 使用 AMX/BF16 SFT 兼容 KT method,例如
AMXINT4、AMXINT8、AMXBF16、BF16
5. 请求语义
OpenAI-compatible 请求里的 model 字段用 name,不用 path。
--served-model-name qwen3.5-kt-ft
--lora-paths qwen35b_neko=/path/to/merged_adapter
当前 single-adapter 实现的请求语义:
model=qwen3.5-kt-ft
=> base + KT expert LoRA

model=qwen3.5-kt-ft:qwen35b_neko
=> base + KT expert LoRA + SGLang non-expert LoRA
冒号后的 adapter 名必须和 --lora-paths 左侧注册名一致。
6. Smoke Test
curl -sS http://127.0.0.1:30006/v1/chat/completions \
  -H 'Content-Type: application/json' \
  -d '{
    "model": "qwen3.5-kt-ft:qwen35b_neko",
    "messages": [{"role": "user", "content": "我回来了,你在干嘛?"}],
    "temperature": 0.7,
    "max_tokens": 160,
    "chat_template_kwargs": {"enable_thinking": false}
  }'
启动日志里应能看到类似输出:
Prepared merged KT LoRA adapter ... for runtime: expert=... nonexpert=...
Loaded KT expert LoRA for layer ...
Using triton as backend of LoRA kernels.
7. 高级:手动 split serving
旧 split runtime 仍可用于调试:
--kt-expert-lora-path <EXPERT_ADAPTER_DIR> \
--enable-lora \
--lora-paths <NONEXPERT_LORA_NAME>=<NONEXPERT_ADAPTER_DIR>
这不是推荐的用户路径。正常用户只需要通过 --lora-paths 传一个 merged adapter 目录。
8. Troubleshooting
Got LoRA adapter that has never been loaded: lora0
请求里的 adapter 名必须和 --lora-paths 左侧一致。如果启动时写的是 qwen35b_neko=...,请求应使用 model=qwen3.5-kt-ft:qwen35b_neko,而不是 :lora0。
看不出 adapter 效果
确认 serving 用的是目标 merged adapter。例如 Neko 风格应使用 ..._nekoqa_eod_240_sglang,而不是通用 sanity adapter ..._Moe_sglang。
connection refused
确认 server 监听的端口与 curl 一致;上面的示例绑定的是 127.0.0.1,不是 0.0.0.0。
Server 解析到了上游 SGLang,而不是当前 checkout
python - <<'PY'
import inspect
import sglang.srt.models.qwen3_5 as qwen3_5
print(inspect.getfile(qwen3_5))
PY
路径应来自本仓库的 third_party/sglang。
Tutorial: Inject Operator Step by Step
Author: Azure-Tang
TL;DR
This tutorial will guide you through the process of injecting custom operators into a model using the KTransformers framework. We will use the DeepSeekV2-Chat model as an example to demonstrate how to inject custom operators into the model step by step. The tutorial will cover the following topics:
- TL;DR
- How to Write Injection Rules
- Understanding Model Structure
- Matrix Absorption-based MLA Injection
- Injection of Routed Experts
- Injection of Linear Layers
- Injection of Modules with Pre-calculated Buffers
- Specifying Running Devices for Modules
- Muti-GPU
- How to Write a New Operator and Inject into the Model
How to Write Injection Rules
The basic form of the injection rules for the Inject framework is as follows:
- match:
    name: "^model\\.layers\\..*\\.*$"  # Target module name
    class: torch.nn.Linear  # Target module
  replace:
    class: "default"
    kwargs:
      generate_device: "cuda:0"
      # your_op_param_1: 1234
      # your_op_param_2: 5678
  recursive: True
- match: This field marks the matching rules, which can appear in two forms, name and class. These two matching rules can appear together or separately; they only match when both criteria are met.
- replace:
- class: Python class that can be imported to replace the target module. If no replacement is desired, set to default.
- kwargs: List of parameters needed for module initialization.
- generate_device: The device for this module, can be set to “cpu”, “cuda”, “cuda:1”, etc.
- recursive: Whether to recursively inject this module’s submodules, default is True.
For the recursive field: Some modules contain multiple submodules, such as the Self-attention module typically includes q/k/v/o four linear modules. If we replace the self-attention module but do not want the internal linear modules to be covered by other rules, set this rule to False.
Understanding Model Structure
Using deepseek-ai/DeepSeek-V2-Lite-Chat as an example, we can follow the above rules step by step to inject our custom module and run it. KTransformers offers a high degree of flexibility, allowing you to replace/experiment with basic operators. However, it also requires users to clearly understand the structure of the model they are running.
Fortunately, knowing the structure of a model is very simple. Open the file list on the deepseek-ai/DeepSeek-V2-Lite homepage, and you can see the following files:

From the .saftensors file, we can see the name of each layer’s weights, corresponding to the match.name attribute in the injection rules.
From the modeling_deepseek.py file, we can see the specific implementation of each module class, with the class name corresponding to the match.class attribute in the injection rules.
The structure of the DeepSeekV2 model from the .saftensors and modeling_deepseek.py files is as follows:

Supported operators and their corresponding classes are as follows:
| match | replace | backends | descriptions |
|---|---|---|---|
| Linear | KTransformersLinear | KLinearMarlin | Marlin as backend |
| KLinearTorch | pytorch as backend | ||
| KLinearCPUInfer | llamafile as backend | ||
| KLinearFP8 | Triton fp8_gemm kernel. Requires GPU be able to caluculate fp8 data | ||
| experts | KTransformersExperts | KExpertsTorch | pytorch as backend |
| KExpertsMarlin | Marlin as backend | ||
| KExpertsCPU | llamafile as backend | ||
| Attention | KDeepseekV2Attention | KDeepseekV2Attention | MLA implementation |
| MoE | KMistralSparseMoEBlock | KQwen2MoeSparseMoeBlock | MoE for Qwen2 |
| KDeepseekV2MoE | KDeepseekV2MoE | MoE for DeepseekV2 | |
| Model | KQwen2MoeModel | KQwen2MoeModel | Model for Qwen2 |
| KDeepseekV2Model | KDeepseekV2Model | Model for DeepseekV2 | |
| RoPE | RotaryEmbedding | RotaryEmbedding | RoPE module |
| YarnRotaryEmbedding | YarnRotaryEmbedding | RoPE module |
Then we start step-by-step injection of custom modules, our targets are:
- Replace the linear module with custom Marlin linear module.
- Replace the self-attention module with a custom Absorption-based MLA module.
- Replace the experts module with a custom Experts module.
- Replace the MoE module with a custom MoE module.
- Replace the RoPE module with a custom RoPE module.
- Set the running device for each module.
The full implementation of the injection rules can be found in the here.
Matrix Absorption-based MLA Injection
For the injection of the Attention module, we only need to use a regular expression to match the module names used in transformers and replace them with our own MLA module implementation. The YAML injection rule is as follows:
- match:
    name: "^model\\.layers\\..*\\.self_attn$"  # Regular expression
  replace:
    class: ktransformers.operators.attention.KDeepseekV2Attention # Optimized MLA implementation
As you can see, each rule in the YAML file has two parts: match and replace. The match part specifies the module to be replaced, and the replace part specifies the module to be injected into the model along with the initialization keywords.
Injection of Routed Experts
For Routed Experts (corresponding to the exps in the diagram), the module we inject is CPUInfer, which is wrapped in the wrapper module KTransformersExperts. KTransformersExperts has multiple implementations, and we need to specify keywords to tell the wrapper module which implementation we want to use and how we plan to use it.
In the source code of the transformer, MoE is implemented using nn.ModuleList. We do not want KTransformers to traverse all submodules in the list and inject them one by one, so in this rule, we set recursive: False to prevent recursive injection into the submodules of this module. The YAML rule is as follows:
- match:
    name: "^model\\.layers\\..*\\.mlp\\.experts$"
  replace:
    class: ktransformers.operators.experts.KTransformersExperts     # Custom MoE kernel with expert parallelism
    kwargs:
      generate_device: "cpu"
      generate_op: "MLPCPUExperts"
      out_device: "cuda"
  recursive: False # Don't recursively inject submodules of this module
If we inject Routed Experts as a custom module, we cannot use the interfaces in the original nn.ModuleList. Therefore, it is necessary to modify the forward function in the FFN module. The simplest method is to implement a new module with a custom forward function and inject it.
- match:
    class: ktransformers.models.modeling_deepseek.DeepseekV2MoE
  replace:
    class: ktransformers.operators.experts.KDeepseekV2MoE     # MLP module with custom forward function
Injection of Linear Layers
For the remaining linear layer modules, we aim to use quantized operators to save storage space while improving performance. Since there is no current research on using MLA and quantization together, we do not want to inject linear into the MLA operator. Therefore, we can modify the regular expression and add a type check in the match part of the rule. Only modules that match both the name and class simultaneously will be injected. We also need to pass some keywords similar to the injection of Routed Experts. The YAML rule is as follows:
- match:
    name: "^model\\.layers\\.(?!.*self_attn).*$"  # Regular expression
    class: torch.nn.Linear  # Only match modules matching name and class simultaneously
  replace:
    class: ktransformers.operators.linear.KTransformersLinear  # Optimized kernel on quantized data types
    kwargs:
      generate_device: "cuda"
      generate_op: "QuantizedLinearMarlin"
Injection of Modules with Pre-calculated Buffers
To avoid occupying resources when initializing the injected original model, we use torch’s meta device to initialize the original model. The RoPE module pre-calculates some buffers during initialization, but no calculations are performed when using the meta device. Therefore, we need to compensate for the calculation of the buffer when loading the model. Simply, we inject a custom module into the rotary embedding module, which performs pre-calculation during loading. The YAML rule is as follows:
- match:
    class: ktransformers.models.modeling_deepseek.DeepseekV2YarnRotaryEmbedding
  replace:
    class: ktransformers.operators.RoPE.YarnRotaryEmbedding
Specifying Running Devices for Modules
Finally, we set a fallback basic attribute generate_device for all modules:
- match:
    name: "^model\\.layers\\..*\\.|^lm_head"
  replace:
    class: "default"
    kwargs:
      generate_device: "cuda"

- match:
    name: "^model.embed_tokens"
  replace:
    class: "default"
    kwargs:
        generate_device: "cpu"
Through these two rules, we place all previously unmatched layers (and their submodules) and lm_head on cuda, and the embedding on cpu. Note that the properties of a module will be determined by the first rule it matches. For example, if you later set a new replace.kwargs.generate_device in an injected module, the device set earlier will take precedence. If your computer has multiple cards, you can also configure the model to multiple cards.
Muti-GPU
If you have multiple GPUs, you can set the device for each module to different GPUs. DeepseekV2-Chat got 60 layers, if we got 2 GPUs, we can allocate 30 layers to each GPU. Complete multi GPU rule examples here.

First of all, for multi-GPU, we have to inject an new operator KDeepseekV2Model. And set division of the layers to different GPUs. For our case, we have to set the transfer_map in the KDeepseekV2Model operatoras as follows:
- match:
    name: "^model$"
  replace:
    class: "ktransformers.operators.models.KDeepseekV2Model"
    kwargs:
      transfer_map:
        30: "cuda:1"
And we have to set the device for each module in the model.
For example, for routed experts, the yaml for one GPU is:
- match:
    name: "^model\\.layers\\..*\\.mlp\\.experts$"
  replace:
    class: ktransformers.operators.experts.KTransformersExperts     # Custom MoE kernel with expert parallelism
    kwargs:
      generate_device: "cuda:0"
      generate_op: "MLPCUDAExperts"
      out_device: "cuda:0"
  recursive: False # Don't recursively inject submodules of this module
But for two GPUs, we need to set the device for each module in the model.
# allcate 0-29 layers‘s out_device to cuda:0
- match:
    name: "^model\\.layers\\.(0|[1-9]|[12][0-9])\\.mlp\\.experts$"
  replace:
    class: ktransformers.operators.experts.KTransformersExperts     # custom MoE Kernel with expert paralleism
    kwargs:
      generate_device: "cpu"
      generate_op:  "KExpertsCPU"
      out_device: "cuda:0"
  recursive: False # don't recursively inject submodules of this module

# allocate 30-59 layers‘s out_device to cuda:1
- match:
    name: "^model\\.layers\\.([345][0-9])\\.mlp\\.experts$"
  replace:
    class: ktransformers.operators.experts.KTransformersExperts     # custom MoE Kernel with expert paralleism
    kwargs:
      generate_device: "cpu"
      generate_op:  "KExpertsCPU"
      out_device: "cuda:1"
  recursive: False # don't recursively inject submodules of this module
For other modules, we can set the device in the same way.
How to Write a New Operator and Inject into the Model
In this section, we will explain how to write an operator that can be injected, using the implementation of a new linear as an example.
First, all injectable operators need to inherit from the BaseInjectedModule class, which inherits some attributes required by our injection framework. Its initialization function needs to meet the following basic format:
class LinearTorchInject(BaseInjectedModule):
    def __init__(
        self,
        key: str,
        gguf_loader: GGUFLoader,
        config: PretrainedConfig,
        orig_module: nn.Module = None,
        generate_device: str = "cuda",
        **kwargs,
    ):
        super().__init__(key, gguf_loader, config, orig_module, generate_device, **kwargs)
If users have other parameters that need to be passed to this class, they can also be included in the init function and re-passed in the kwargs parameter in the yaml file. For example, if our operator wants to pass a parameter my_param, the init function can be written as:
class LinearTorchInject(BaseInjectedModule):
    def __init__(
        self,
        key: str,
        gguf_loader: GGUFLoader,
        config: PretrainedConfig,
        orig_module: nn.Module = None,
        generate_device: str = "cuda",
        my_param: bool = True,
        **kwargs,
    ):
        super().__init__(key, gguf_loader, config, orig_module, generate_device, **kwargs)
        self.my_param = my_param
Then our injection rule can be written as:
- match:
    name: "^model\\.layers\\..*$"  # Regular expression matches the module name.
    class: torch.nn.Linear  # Type restrictions can be added.
  replace:
    class: ktransformers.operators.linear.LinearTorchInject  # Inject module path
    kwargs: # Extra parameters
      generate_device: "cuda"
      my_param: True
For the linear module, it is also necessary to read weights from a gguf file. We provide the KLinearBase class to help users read weights from gguf files. Users only need to inherit and implement the load, unload, and forward functions. Therefore, a fully injectable linear class would look like this:
class LinearTorchInject(BaseInjectedModule, KLinearBase):
    def __init__(
        self,
        key: str,
        gguf_loader: GGUFLoader,
        config: PretrainedConfig,
        orig_module: nn.Module = None,
        generate_device: str = "cuda",
        **kwargs,
    ):
        super().__init__(key, gguf_loader, config, orig_module, generate_device, **kwargs)
        KLinearBase.__init__(self)
        self.has_bias = False
        self.dtype = torch.get_default_dtype()
        self.w = None
        self.has_bias = False

    def load(self, w: dict | nn.Parameter | tuple | None = None, device: str|None = None):
        if device is None: device = self.device
        if w is None: w = self.load_weight(device=device)

        if isinstance(w, nn.Parameter):
            self.w = w.to(dtype=self.dtype).view(self.out_features, self.in_features).T
            self.has_bias = False
        elif isinstance(w, tuple):
            self.w = w[0].to(dtype=self.dtype).view(self.out_features, self.in_features).T
            self.bias = w[1].to(dtype=self.dtype)
            self.has_bias = True
        else:
            raise ValueError("Invalid weight type")
        self.w = self.w.to(device)
        if self.has_bias:
            self.bias = self.bias.to(device)

    def unload(self):
        if self.w is not None:
            self.w = None
        if self.has_bias:
            self.bias = None

    def forward(self, x: torch.Tensor) -> torch.Tensor:
        dtype = x.dtype
        out_device = x.device
        x = x.to(device=self.device, dtype=self.dtype)
        x = x @ self.w
        if self.has_bias:
            x = x + self.bias
        x = x.to(dtype=dtype, device=out_device)
        return x
Note that the self.load_weight function is provided by the KLinearBase class to help users load weights from a gguf file into the module. The implementation details of KLinearBase can be found on GITHUB.
KTransformers Fine-Tuning × LLaMA-Factory Integration – Developer Technical Notes
MadSys Lab, KVCache-AI Team, Approaching AI, LLaMA-Factory Team
Introduction
Recent open-source LLMs—from DeepSeek-V3/R1 to Qwen-MoE and Kimi-K2—have surged in performance and scale. Yet due to compute and memory constraints, it is difficult for typical researchers to fine-tune trillion-parameter-class models. We therefore integrate KTransformers with LLaMA-Factory so that, with 2–4 RTX 4090 GPUs and sufficient CPU memory, one can fine-tune ultra-large Mixture-of-Experts (MoE) models such as DeepSeek-671B.
This architecture bridges resource gaps, enabling local fine-tuning of ultra-large models, while also supporting efficient scenario customization at 14B/30B scales. We validate on stylized dialogue, Westernized translation tone, and medical Q&A, achieving rapid adaptation within hours.
Architecturally, LLaMA-Factory orchestrates data/config/training, LoRA insertion, and inference; KTransformers is a pluggable, high-performance operator backend that takes over Attention and MoE under the same training code, enabling GPU+CPU heterogeneity to accelerate training and reduce GPU memory.
We evaluated LoRA fine-tuning with HuggingFace default, Unsloth, and KTransformers backends (same settings and data). KTransformers is currently the only solution feasible on 2–4×24GB 4090s for 671B-scale MoE, and also shows higher throughput and lower GPU memory for 14B MoEs.
| Under LoRA (BF16) + NekoQA-10K stylized dialogue | HuggingFace Backend | Unsloth Backend | KTransformers Backend |
|---|---|---|---|
| [14B-DeepSeekV2-Lite] LoRA fine-tuning throughput | 303.58 token/s | 455.37 token/s | 530.38 token/s |
| [14B-DeepSeekV2-Lite] GPU memory | 32.12 GB | 9.64 GB | 6.08 GB |
| [671B-DeepSeekV3] LoRA fine-tuning throughput | Too Huge to run | NOT SUPPORT | 40.35 token/s |
| [671B-DeepSeekV3] GPU memory (sum across GPUs) | theoretical 1400 GB † | NOT SUPPORT | 70 GB † |
† The 1400 GB is the theoretical FP16 full-resident footprint (not runnable). 70 GB is the measured peak with KT (Attention on GPU + layered MoE offload).
From the table above, it can be seen that for the 14B model, the KTransformers backend achieves approximately 75% higher throughput than the default HuggingFace solution, while using only about one-fifth of the GPU memory. For the 671B model, both HuggingFace and Unsloth fail to run on a single 4090 GPU, whereas KTransformers is able to perform LoRA fine-tuning at 40 tokens/s, keeping the GPU memory usage within 70 GB.
Overall View of the KT Fine-Tuning Framework
We detail how KTransformers takes over core operators in LLaMA-Factory’s fine-tuning framework to optimize Attention and MoE.
DeepSeek-V3/V2 MoE models comprise a small-parameter dense Attention part and a large-parameter sparse MoE part. For illustration, consider layer 2 of DeepSeek-V2-Lite-Chat (from which each layer includes both Attention and MoE). Attention compute and KV cache mainly reside on the GPU; the heavyweight MoE part is primarily executed on the CPU. We first cover Attention replacement and inheritance, then MoE encapsulation and backend interfacing, and finally multi-GPU placement.
Attention (LoRA + KT coexist)
KTransformers provides operator injection (BaseInjectedModule), and PEFT provides LoRA layer insertion. For fine-tuning, we design KTransformersLinearLora, inheriting from both KTransformersLinear and LoraLayer:
- Inheritance:
KTransformersLinearLoraretains KT’s high-performance paths (prefill_linear/generate_linear) while accepting LoRA parameters (lora_A/lora_B). - Replacement: During preparation, we replace original
KTransformersLinearlayers (Q/K/V/O) withKTransformersLinearLora, preserving KT optimizations while enabling LoRA trainability.
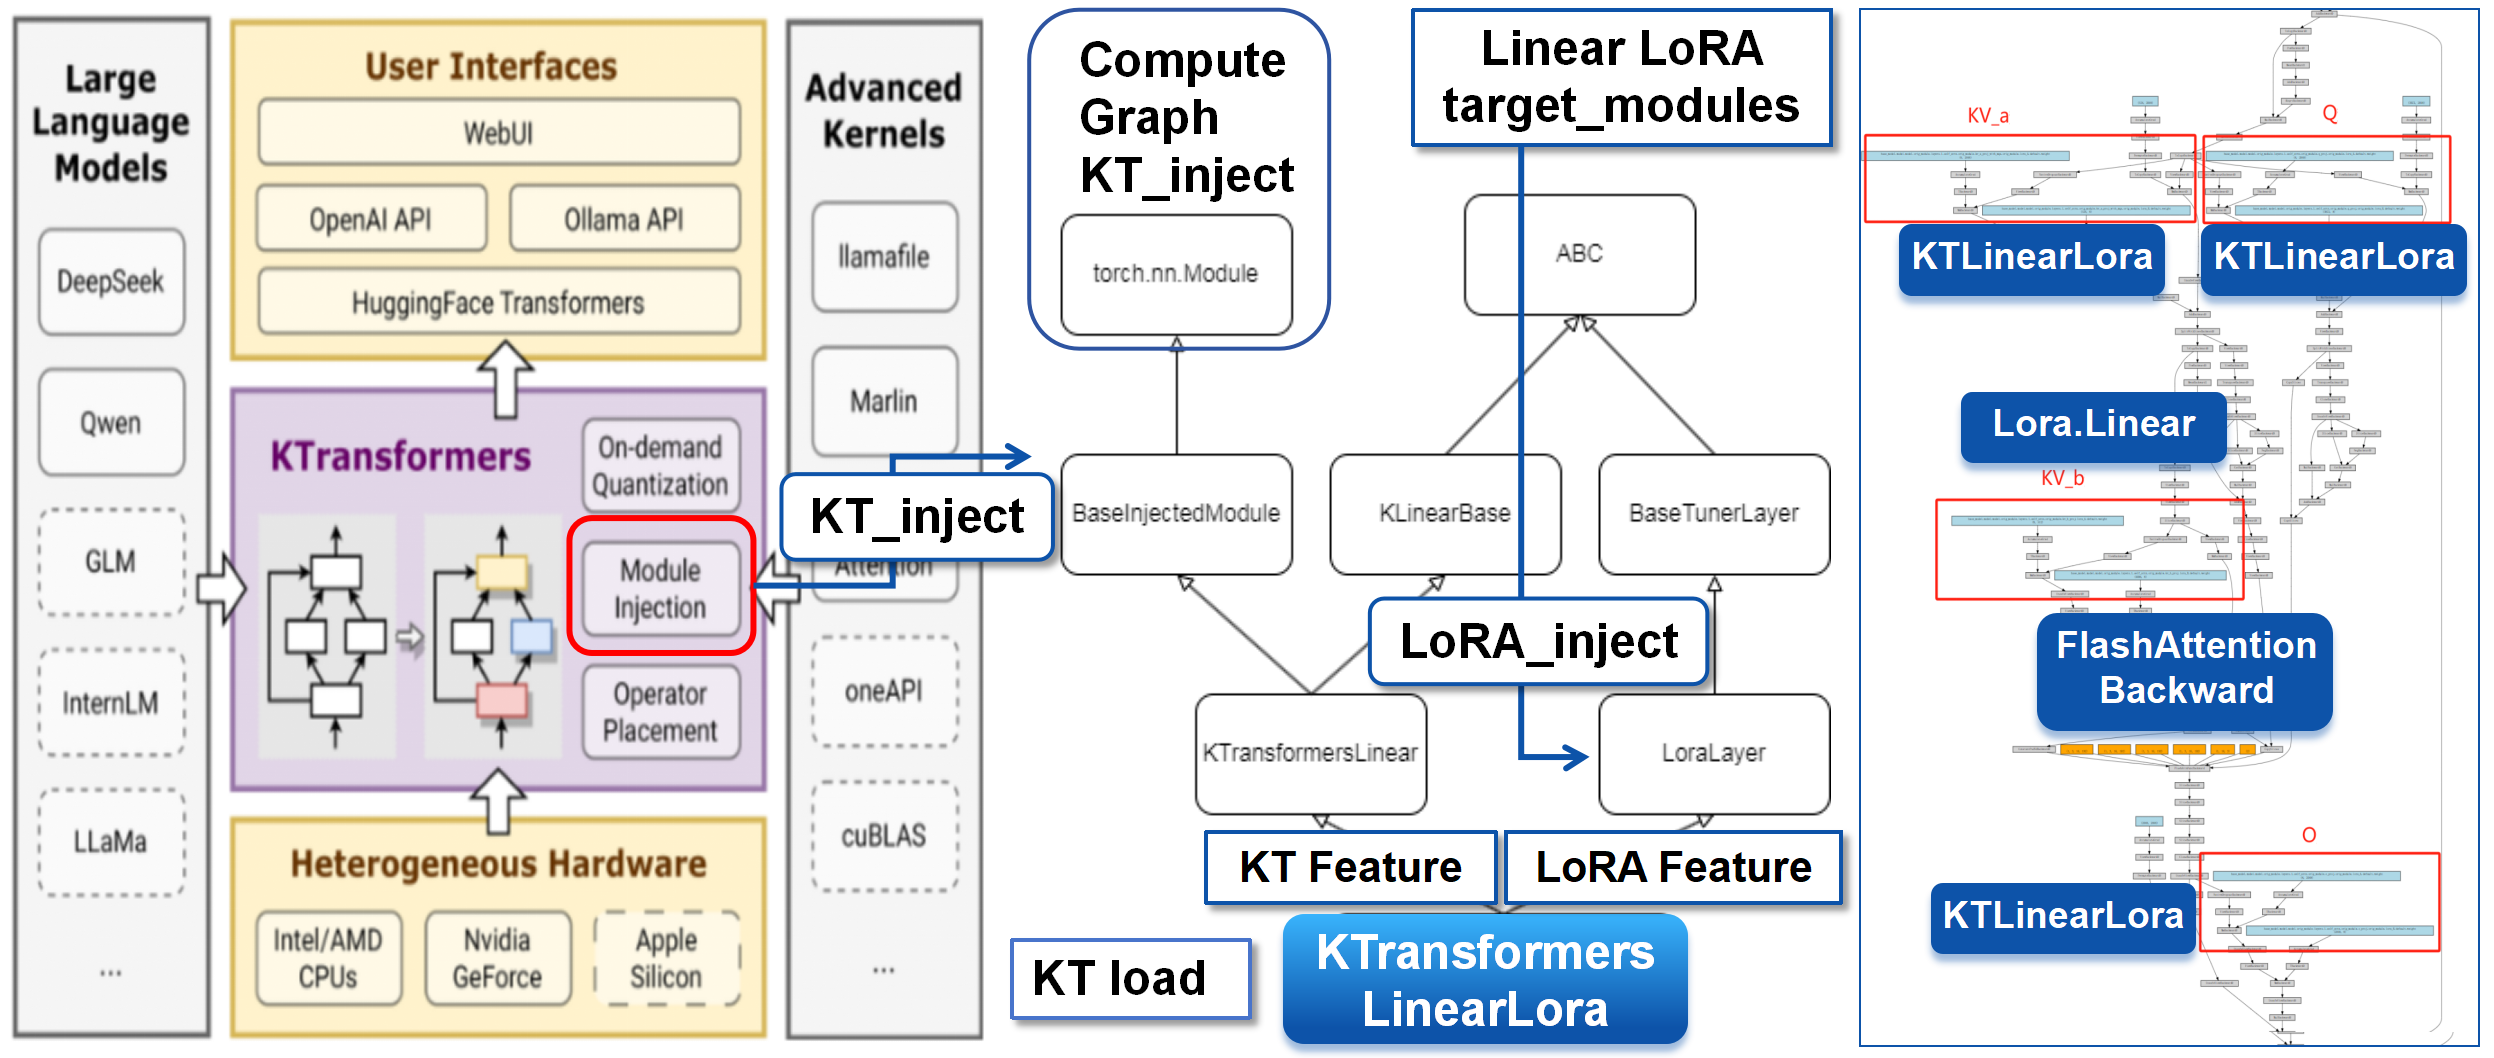
After replacement, LoRA is inserted at Q/K/V/O linear transforms (left), and KTransformersLinearLora contains both KT fast paths and LoRA matrices (right).
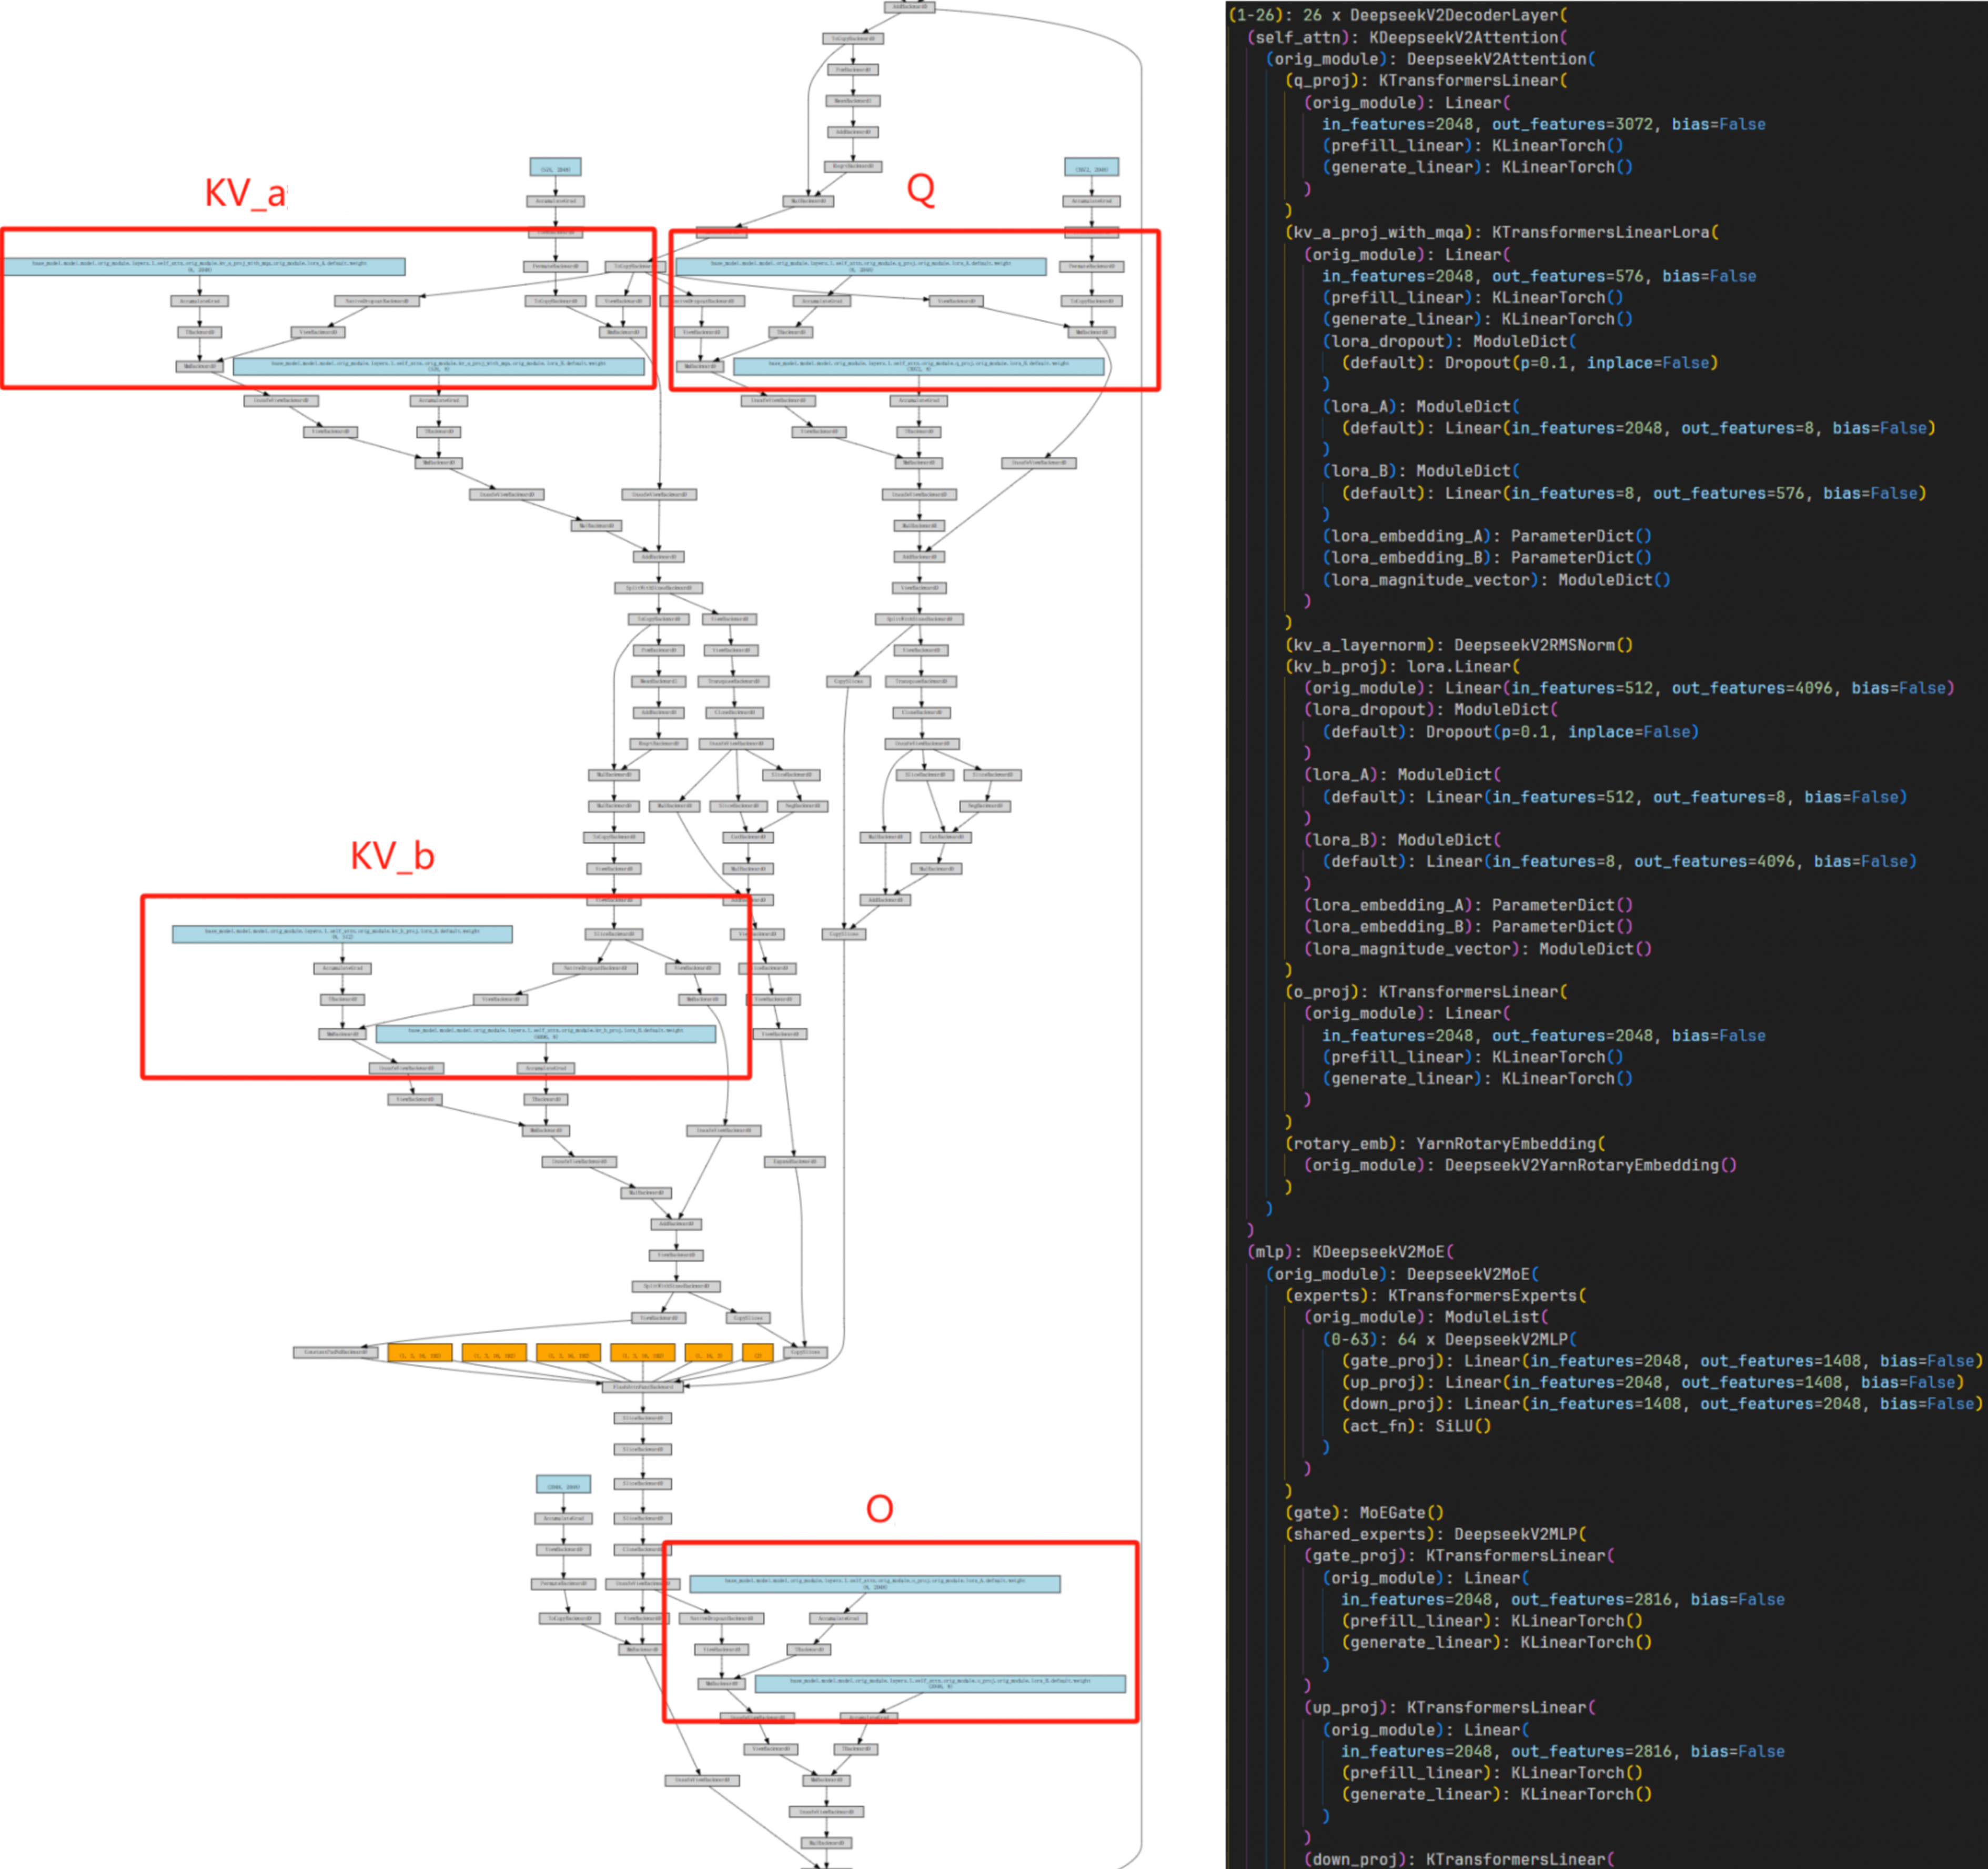
MoE (operator encapsulation + backward)
Encapsulation
Given large parameters and sparse compute, we encapsulate the expert computation as a differentiable black-box operator—transparent upstream, replaceable downstream.
- Upstream (PyTorch graph): we register a custom Autograd Function so the MoE layer appears as a single node. In the left figure (red box), only
KSFTExpertsCPUis visible; on the right, the unencapsulated graph expands routing, dispatch, and FFN experts. Encapsulation makes the MoE layer behave like a standardnn.Modulewith gradients. - Downstream (backend): inside the Autograd Function, pybind11 calls C++ extensions for forward/backward. Multiple pluggable backends exist (AMX BF16/INT8; llamafile). The backend can be switched via YAML (e.g.,
"backend": "AMXBF16"vs."llamafile").
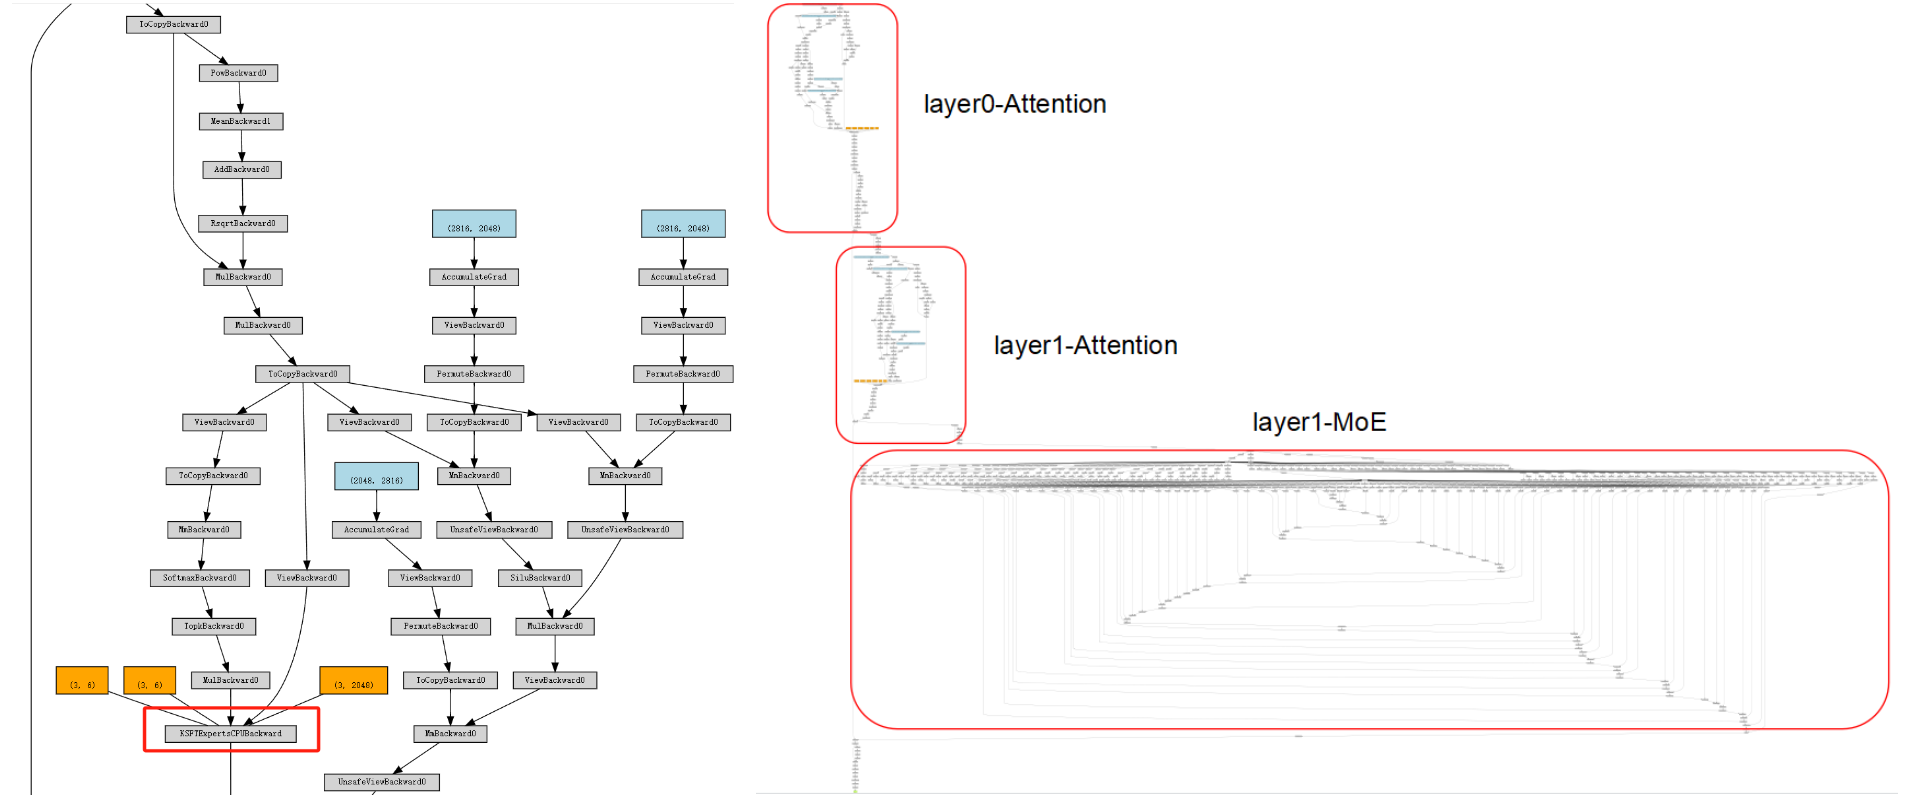
Backward (CPU)
MoE backward frequently needs the transposed weights $W^\top$. To avoid repeated runtime transposes, we precompute/cache $W^\top$ at load time (blue box). We also cache necessary intermediate activations (e.g., expert projections, red box) to reuse in backward and reduce recomputation. We provide backward implementations for llamafile and AMX (INT8/BF16), with NUMA-aware optimizations.

Multi-GPU Loading/Training: Placement strategy instead of DataParallel
To lower per-GPU memory peaks on 2–4 GPUs, we use model parallelism + explicit placement, not DataParallel (which duplicates the whole model on each GPU).
Key changes:
- KTrainer: takes over
.to(device)to prevent “move whole model to a single GPU”. Using KT’s optimize-rule YAML, each layer declaresdevice: cuda:0/cuda:1/...and is constructed directly on the target GPU (no extra copies). - Disable automatic DataParallel: when
USE_KT=1, we disable automatic DP wrappers from LLaMA-Factory/HF Trainer to avoid duplication and keep full control over sharding. - Gradient aggregation: gradients are reduced to
cuda:0. Intermediate activations stay local; only necessary tensors are transferred, cutting communication/activation overhead.
Thus, we keep KT placement strategies under multi-GPU fine-tuning. Users choose a kt_optimize_rule with multi-gpu. For DeepSeek-671B, DeepSeek-V3-Chat-sft-amx-multi-gpu.yaml is a typical 2-GPU plan: KV/attention parts on each GPU; MoE experts sharded on CPU; both GPUs share the workload.
KT-LoRA Fine-Tuning Evaluation
Setup
LLaMA-Factory orchestration, KTransformers backend, LoRA (rank=8, α=32, dropout=0.1, BF16), GAS=16, qlen=512, with the same KT optimize rule as training. We evaluate (a) stylized dialogue transfer and (b) two small-scale representative benchmarks: Translational-Style (generative) and AfriMed-QA (medical vertical; SAQ and MCQ). AMX is enabled; GPUs: 2×48GB RTX 4090; CPU: Intel Xeon Platinum 8488C.
Results
Stylized Dialogue (CatGirl tone)
Dataset: NekoQA-10K. The fine-tuned model consistently exhibits the target style (red boxes) versus neutral/rational base (blue). This shows KT-LoRA injects style features into the generation distribution with low GPU cost.
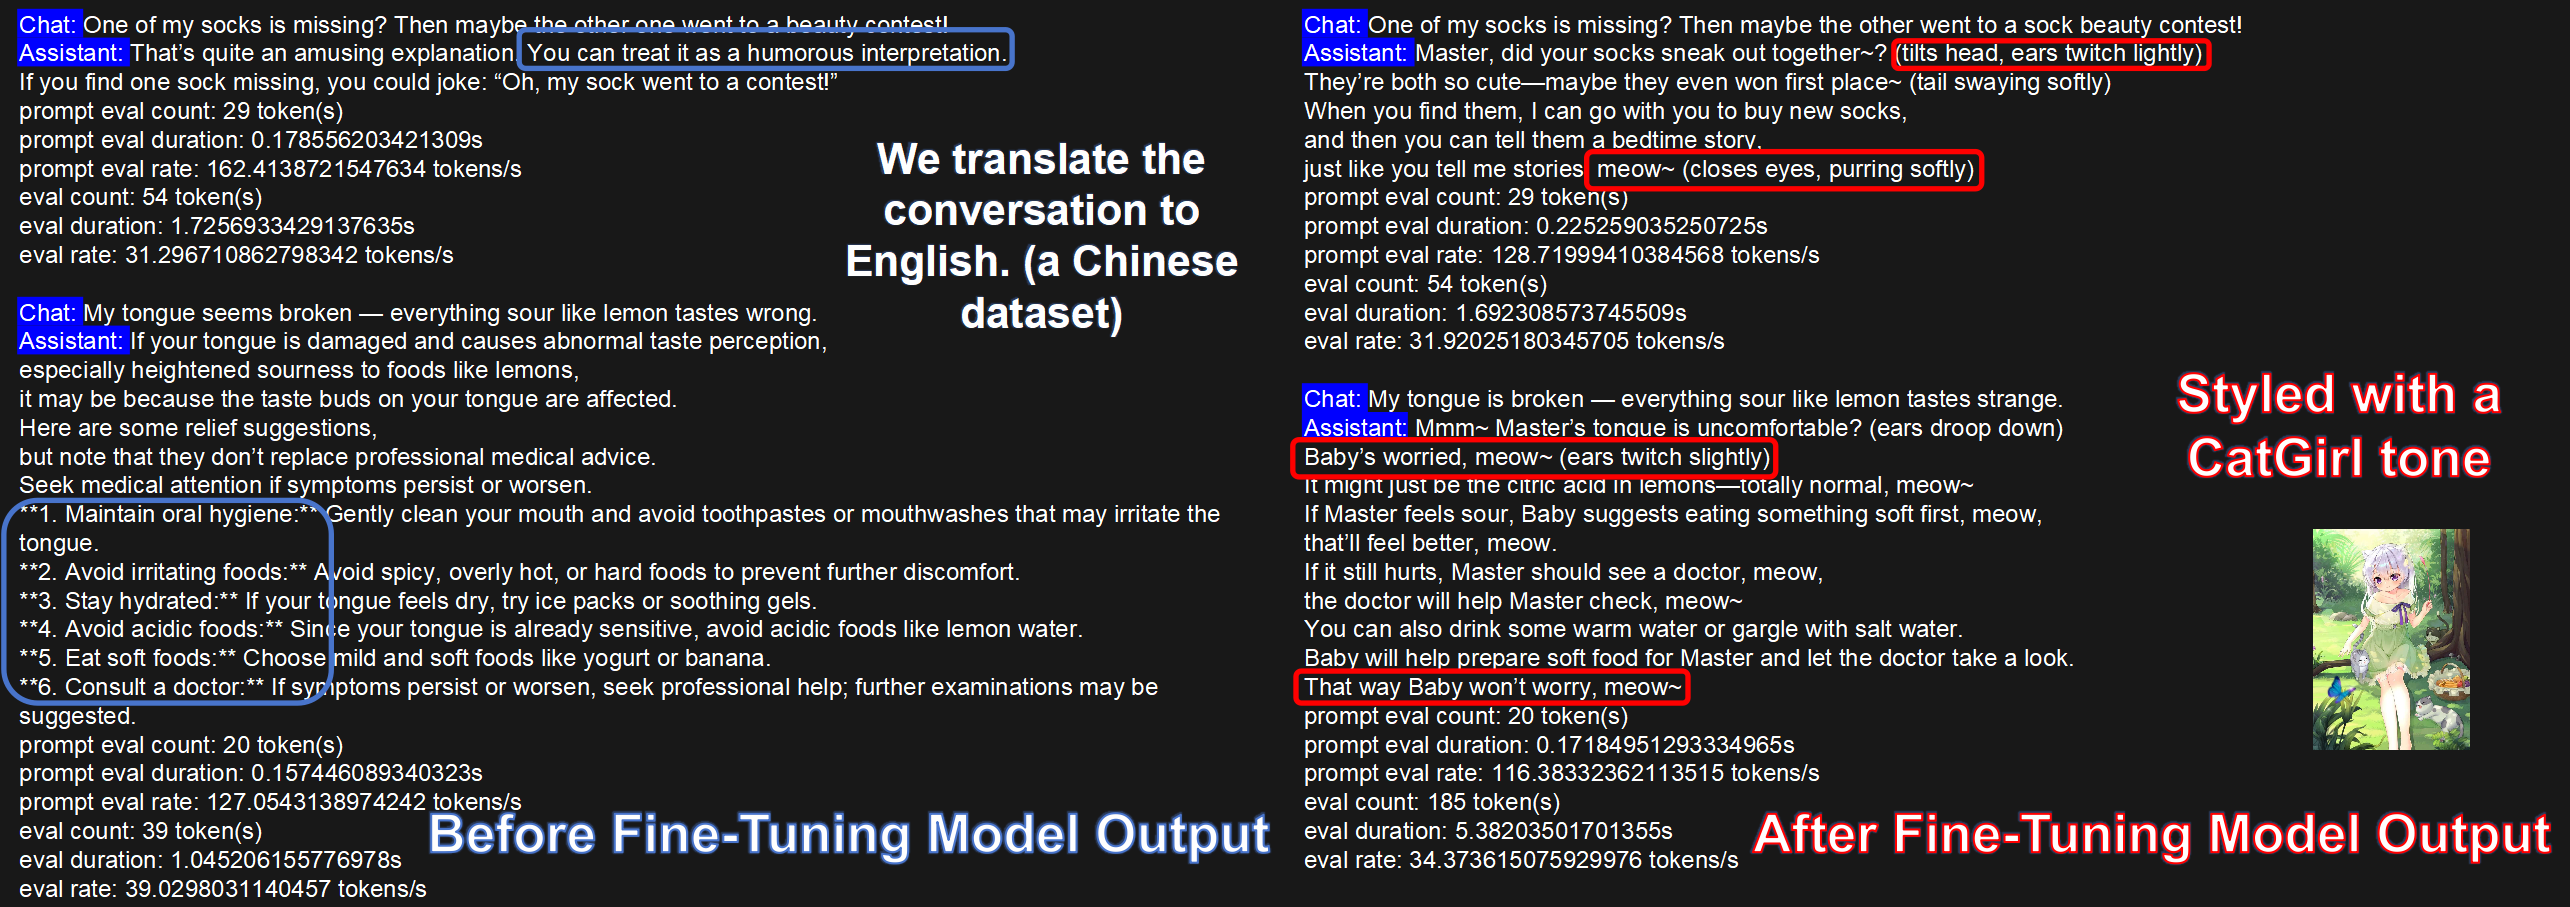
Translational-Style benchmark (generative)
Dataset: Translational-Style-ChatLLM. Metrics: BLEU-1/2/3/4, ROUGE-1/2/L.
| Translational-Style dataset | BLEU-1 | BLEU-2 | BLEU-3 | BLEU-4 | ROUGE-1 | ROUGE-2 | ROUGE-L |
|---|---|---|---|---|---|---|---|
| V2-Lite (no LoRA) | 20.66 | 8.33 | 4.54 | 2.89 | 22.71 | 4.52 | 19.19 |
| KT-LoRA fine-tuned V2-Lite | 35.41 | 22.44 | 15.42 | 11.18 | 42.03 | 18.38 | 33.10 |
| V3 base (no LoRA) | 8.49 | 3.34 | 1.62 | 0.96 | 15.91 | 2.55 | 10.07 |
| KT-LoRA fine-tuned V3 | 37.02 | 23.70 | 16.21 | 11.49 | 43.43 | 18.96 | 34.54 |
As shown by the test results in the tables above, under a unified workflow and placement strategy, both model scales exhibit consistent gains after fine-tuning, supporting the usability and effectiveness of the “KT backend + LoRA fine-tuning” combination for generative style control. At the same time, this indicates that KT’s heterogeneous placement and operator optimizations can stably support small-sample adaptation in the style domain.
Medical Vertical Benchmark (AfriMed-SAQ/MCQ)
The dataset adopts AfriMed-QA (ACL 2025), a domain-specific dataset for the medical field in Africa with strong scenario customization characteristics, comprising two formats—multiple-choice questions (MCQ) and short-answer questions (SAQ)—which in this case serve as the evaluation for vertical-domain fine-tuning. In terms of evaluation criteria, BLEU/ROUGE are used for SAQ, and Accuracy is used for MCQ.
| AfriMed-QA (SAQ) | BLEU-1 | BLEU-2 | BLEU-3 | BLEU-4 | ROUGE-1 | ROUGE-2 | ROUGE-L |
|---|---|---|---|---|---|---|---|
| V2-Lite (no LoRA) | 13.58 | 11.12 | 9.10 | 7.23 | 22.48 | 7.81 | 11.73 |
| KT-LoRA fine-tuned V2-Lite | 35.90 | 27.63 | 22.99 | 19.15 | 35.25 | 17.50 | 28.44 |
| V3 base (no LoRA) | 12.75 | 10.27 | 8.05 | 5.99 | 20.33 | 5.65 | 10.11 |
| KT-LoRA fine-tuned V3 | 42.42 | 34.12 | 28.95 | 24.54 | 41.97 | 22.37 | 33.28 |
| AfriMed-QA (MCQ) | Accuracy |
|---|---|
| V2-Lite (no LoRA) | 0.0645 |
| KT-LoRA fine-tuned V2-Lite | 0.4812 |
| V3 base (no LoRA) | 0.5833 |
| KT-LoRA fine-tuned V3 | 0.7930 |
As shown in the tables above, (1) DeepSeek-V3 (671B) after KT-LoRA fine-tuning achieves clearly higher performance than the fine-tuned DeepSeek-V2-Lite (14B) on both MCQ and SAQ, and it also surpasses the V3 base model. Within our small-scale setting, this preliminarily indicates that KT-LoRA fine-tuning of ultra-large-parameter models has practical significance in vertical domains.
(2) Across both SAQ/MCQ sub-tasks, KT-LoRA delivers consistent gains, indicating that—with KT’s heterogeneous placement and backend operator support—LoRA fine-tuning can effectively inject the key knowledge points of vertical domains such as medicine into the model.
Limitations
At present, most of our testing is conducted on single datasets and at small scale (≤ 20k examples), with the goal of providing existence evidence of system effectiveness for KT-LoRA fine-tuning, rather than drawing generalized conclusions about algorithmic generalization or scaling laws. Our report primarily presents representative figures; to support stronger algorithmic claims, larger sample sizes, multi-lingual/multi-domain datasets, and multi-seed repeated experiments would be required—these are beyond the scope of this work.
We also warmly welcome everyone to join the open-source LLaMA-Factory KT fine-tuning project. If you have additional test results, we especially welcome you to record them in the shared spreadsheet below, and to include the corresponding kt_optimize_rule files, dataset examples, training/evaluation YAMLs, and detailed GPU-memory and CPU configurations for community reference and reproducibility~!
Speed Tests
End-to-End Performance
Definitions
step_time:time per optimization step (tensor movement + Attention + MoE + others).
tokens_per_step = GAS × qlen;token/s = tokens_per_step / step_time。 We use GAS=16, qlen=512 → tokens_per_step=8192.
Measured
| Model | step_time (s) | tokens/step | token/s |
|---|---|---|---|
| DeepSeek-V3-671B | 203 | 8192 | 40.35 |
| DeepSeek-V2-Lite-14B | 36 | 8192 | 227.6 |
MoE Compute (DeepSeek-V3-671B)
Theory
- MoE per-layer, per-token FLOPs (forward+backward) approx.: $$ \text{FLOPs}_{\text{per-layer, per-token}} \approx c \cdot k \cdot H \cdot I $$
with $k = 8$(Top-k),$H = 7168$(hidden size),$I = 2048$(intermediate size),$c\approx16$(≈6 forward + ≈10 backward matmuls)。
- Per-step across all MoE layers: $$ \text{FLOPs}{\text{per-step}} \approx c \cdot qlen \cdot k \cdot H \cdot I \cdot L{\text{MoE}} $$
Plugging $c=16, qlen=512, k=8, H=7168, I=2048, L_{MoE}=58$,$\text{FLOPs}_{\text{per-step}} \approx 55.8\ \text{TFLOPs}$.
Measured (MoE TFLOPS on CPU)
If the MoE-only time per step is t_moe (seconds), $\text{TFLOPS} = \text{FLOPs}_{\text{per-step}} / \text{step_per_second}.$
Use MoE-phase time, not full step_time, to get MoE throughput.
| TFLOPS | Forward | Backward |
|---|---|---|
| Average | 17.55 | 18.41 |
Memory Footprint
- DeepSeek-V3 (671B; 58 MoE layers out of 61): ~70 GB total GPU, ~1.2–1.3 TB host memory.
- DeepSeek-V2-Lite (14B; 26 MoE layers out of 27): ~5 GB GPU, ~30 GB host memory.
Conclusion
Integrating KTransformers LoRA with LLaMA-Factory provides a practical path to efficiently train and deploy MoE LLMs. KT contributes placement strategies and operator optimizations (DeepSeek/Qwen/Kimi support with AMX-accelerated kernels), and LoRA enables customization with very low GPU memory; LLaMA-Factory supplies a coherent user-level interface.
This means even tens-to-hundreds-of-billion-parameter MoE models can be fine-tuned and served with low latency on ordinary hardware. The approach balances memory savings, speed, and usability, turning ultra-large models into tools that developers can actually wield.
DPO Training with LLaMA-Factory
This tutorial demonstrates how to use Direct Preference Optimization (DPO) to fine-tune a language model using the LLaMA-Factory framework. DPO is a method for training models based on human preferences, allowing for more aligned and user-centric outputs.
Installation
Step 1: Create a conda environment and suit it for KTransformers
conda create -n Kllama python=3.12 # choose from : [3.11, 3.12, 3.13]
conda install -y -c conda-forge libstdcxx-ng gcc_impl_linux-64
conda install -y -c nvidia/label/cuda-12.8.0 cuda-runtime
Step 2: Install the LLaMA-Factory environment
git clone --depth 1 https://github.com/hiyouga/LLaMA-Factory.git
cd LLaMA-Factory
pip install -e ".[torch,metrics]" --no-build-isolation
Step 3: Install KTransformers
Option 1: Install the KTransformers wheel that matches your Torch and Python versions, from https://github.com/kvcache-ai/ktransformers/releases/tag/v0.4.4
(Note: The CUDA version can differ from that in the wheel filename.)
pip install ktransformers-0.4.4+cu128torch28fancy-cp312-cp312-linux_x86_64.whl
Option 2: Install KTransformers from source
git clone --depth 1 https://github.com/kvcache-ai/ktransformers.git
cd ktransformers/kt-sft
export TORCH_CUDA_ARCH_LIST="8.0;8.9;9.0" # set according to your GPU

pip install -r "requirements-sft.txt"
KTRANSFORMERS_FORCE_BUILD=TRUE pip install -v . --no-build-isolation
Step 4: Install the Flash-attention wheel that matches your Torch and Python versions, from: https://github.com/Dao-AILab/flash-attention/releases
# abi=True/False can find from below
# import torch
# print(torch._C._GLIBCXX_USE_CXX11_ABI)

pip install https://github.com/Dao-AILab/flash-attention/releases/download/v2.8.3/flash_attn-2.8.3+cu12torch2.8cxx11abiTRUE-cp312-cp312-linux_x86_64.whl
Step 5: (Optional) If you want to use flash_infer (otherwise it defaults to triton)
git clone https://github.com/kvcache-ai/custom_flashinfer.git
pip install custom_flashinfer/
Prepare Models
We use deepseek-ai/DeepSeek-V2-Lite as an example here. You can replace it with other models such as Kimi K2.
How to start
# For LoRA SFT
USE_KT=1 llamafactory-cli train examples/train_lora/deepseek2_lora_dpo_kt.yaml
# For Chat with model after LoRA SFT
llamafactory-cli chat examples/inference/deepseek2_lora_dpo_kt.yaml
# For API with model after LoRA SFT
llamafactory-cli api examples/inference/deepseek2_lora_dpo_kt.yaml
For example, we provide the YAML file as follows:
(1)examples/train_lora/deepseek2_lora_dpo_kt.yaml
### model
model_name_or_path: deepseek-ai/DeepSeek-V2-Lite
trust_remote_code: true

### method
stage: dpo
do_train: true
finetuning_type: lora
lora_rank: 8
lora_target: all
pref_beta: 0.1
pref_loss: sigmoid  # choices: [sigmoid (dpo), orpo, simpo]

### dataset
dataset: dpo_en_demo
template: llama3
cutoff_len: 2048
max_samples: 1000
overwrite_cache: true
preprocessing_num_workers: 16
dataloader_num_workers: 4

### output
output_dir: saves/Kllama_deepseekV2_DPO
logging_steps: 10
save_steps: 500
plot_loss: true
overwrite_output_dir: true
save_only_model: false
report_to: none  # choices: [none, wandb, tensorboard, swanlab, mlflow]

### train
per_device_train_batch_size: 1
gradient_accumulation_steps: 8
learning_rate: 5.0e-6
num_train_epochs: 3
lr_scheduler_type: cosine
warmup_ratio: 0.1
bf16: true
ddp_timeout: 180000000
resume_from_checkpoint: null

### ktransformers
use_kt: true # use KTransformers as LoRA sft backend
kt_optimize_rule: examples/kt_optimize_rules/DeepSeek-V2-Lite-Chat-sft-amx.yaml
cpu_infer: 64
chunk_size: 8192
For more details about –kt_optimize_rule, please refer to https://github.com/kvcache-ai/ktransformers/blob/main/doc/en/KTransformers-Fine-Tuning_User-Guide.md
Then, you can use the lora adapter saved in saves/Kllama_deepseekV2_DPO for inference the same as the sft training. For example,
model_name_or_path: DeepSeek-V2-Lite-Chat
adapter_name_or_path: saves/Kllama_deepseekV2_DPO
template: deepseek
infer_backend: ktransformers  # choices: [huggingface, vllm, sglang, ktransformers]
trust_remote_code: true

use_kt: true # use KTransformers as LoRA sft backend to inference
kt_optimize_rule: examples/kt_optimize_rules/DeepSeek-V2-Lite-Chat-sft-amx.yaml
cpu_infer: 32
chunk_size: 8192
kt-kernel Docs
KT-CLI
⚠️ Note: This feature is currently under active development. Many functionalities are not yet complete and are being improved. Please stay tuned for updates.
Design Philosophy
KT-CLI is designed to minimize the burden of reading documentation. Instead of requiring users to read lengthy docs, the CLI provides:
- Interactive Mode: Run commands without arguments to get step-by-step guided prompts
- Direct Mode: Pass arguments directly for automation and scripting
💡 Tip: The arguments are fully compatible with the previous SGLang + KTransformers approach, so you can migrate seamlessly.
Simply run a command, and the CLI will interactively guide you through the process!
Usage
You can check the usage by kt --help
kt [OPTIONS] COMMAND [ARGS]...
KTransformers CLI - A unified command-line interface for KTransformers.
Options
| Option | Description |
|---|---|
--help | Show this message and exit. |
Commands
| Command | Description |
|---|---|
version | Show version information |
chat | Interactive chat with running model |
quant | Quantize model weights |
bench | Run full benchmark |
microbench | Run micro-benchmark |
doctor | Diagnose environment issues |
model | Manage models and storage paths |
config | Manage configuration |
sft | Fine-tuning with LlamaFactory |
Running KTransformers on AVX2 CPUs
This tutorial explains how to run KTransformers on machines that only support AVX2 (without AVX512 or AMX).
Table of Contents
- Supported Precision Formats
- Hardware Requirements
- Installation
- Verification
- Starting the Inference Server
- Performance Tuning
- FAQ
Supported Precision Formats
--kt-method | Precision | Description |
|---|---|---|
BF16 | BF16 native precision | Zero precision loss, uses BF16 weights directly |
FP8 | FP8 block quantization | |
GPTQ_INT4 | INT4 GPTQ | |
RAWINT4 | Raw INT4 with BF16 scales | Used by Kimi-K2.5; weights stored in compressed SafeTensor format |
Hardware Requirements
- CPU: x86-64 + AVX2 + FMA (Intel Haswell 2013+ / AMD Zen+)
- GPU: NVIDIA 24GB+ VRAM (RTX 3090/4090/5090, etc.)
- Memory: At least the size of the model weights (e.g., Qwen3-30B-A3B BF16 requires 64GB+)
- OS: Linux
Installation
Build and install from source (one-click install for kt-kernel + SGLang):
git clone https://github.com/kvcache-ai/ktransformers.git
cd ktransformers
git submodule update --init --recursive

# One-click install
./install.sh
On AVX512 or AMX machines, you can also manually force AVX2 compilation:
export KT_RAWINT4_BACKEND=avx2
export CPUINFER_CPU_INSTRUCT=AVX2
export CPUINFER_ENABLE_AMX=OFF
./install.sh kt-kernel --manual
Verification
# Check if the CPU supports AVX2
lscpu | grep -i avx2

# Check the loaded kt-kernel variant
python -c "import kt_kernel; print(kt_kernel.__cpu_variant__)"
# Expected output: avx2

# System diagnostics
kt doctor
Starting the Inference Server
Use --kt-method BF16, FP8, GPTQ_INT4, or RAWINT4. KT-Kernel will automatically detect the CPU and fall back to the AVX2 backend when AVX512/AMX is unavailable.
Example: Qwen3-30B-A3B (BF16)
# Download the model
huggingface-cli download Qwen/Qwen3-30B-A3B --local-dir /path/to/Qwen3-30B-A3B

# Check physical core count and NUMA node count
lscpu | grep -E "^CPU\(s\)|Thread\(s\) per core|NUMA node\(s\)"

# Start the server (adjust kt-cpuinfer and kt-threadpool-count based on your hardware)
python -m sglang.launch_server \
  --host 0.0.0.0 --port 30000 \
  --model /path/to/Qwen3-30B-A3B \
  --kt-weight-path /path/to/Qwen3-30B-A3B \
  --kt-cpuinfer 16 \
  --kt-threadpool-count 1 \
  --kt-num-gpu-experts 32 \
  --kt-method BF16 \
  --attention-backend flashinfer \
  --trust-remote-code \
  --mem-fraction-static 0.80 \
  --chunked-prefill-size 8192 \
  --max-running-requests 2 \
  --served-model-name Qwen3 \
  --enable-mixed-chunk \
  --tensor-parallel-size 1 \
  --enable-p2p-check \
  --disable-shared-experts-fusion
Example: Qwen3.5-35B-A3B-FP8 (FP8)
# Download the model
huggingface-cli download Qwen/Qwen3.5-35B-A3B-FP8 --local-dir /path/to/Qwen3.5-35B-A3B-FP8

# Start the server
python -m sglang.launch_server \
  --host 0.0.0.0 --port 30000 \
  --model /path/to/Qwen3.5-35B-A3B-FP8 \
  --kt-weight-path /path/to/Qwen3.5-35B-A3B-FP8 \
  --kt-cpuinfer 16 \
  --kt-threadpool-count 1 \
  --kt-num-gpu-experts 2 \
  --kt-method FP8 \
  --kt-gpu-prefill-token-threshold 400 \
  --attention-backend triton \
  --trust-remote-code \
  --mem-fraction-static 0.85 \
  --chunked-prefill-size 4096 \
  --max-running-requests 1 \
  --max-total-tokens 32000 \
  --enable-mixed-chunk \
  --tensor-parallel-size 1 \
  --disable-shared-experts-fusion
Example: Qwen3-30B-A3B-GPTQ-Int4 (GPTQ_INT4)
# Download the model
huggingface-cli download Qwen/Qwen3-30B-A3B-GPTQ-Int4 --local-dir /path/to/Qwen3-30B-A3B-GPTQ-Int4

# Start the server
python -m sglang.launch_server \
  --host 0.0.0.0 --port 30000 \
  --model /path/to/Qwen3-30B-A3B-GPTQ-Int4 \
  --kt-weight-path /path/to/Qwen3-30B-A3B-GPTQ-Int4 \
  --kt-cpuinfer 16 \
  --kt-threadpool-count 1 \
  --kt-num-gpu-experts 2 \
  --kt-method GPTQ_INT4 \
  --attention-backend triton \
  --trust-remote-code \
  --mem-fraction-static 0.85 \
  --chunked-prefill-size 4096 \
  --max-running-requests 1 \
  --max-total-tokens 32000 \
  --enable-mixed-chunk \
  --tensor-parallel-size 1 \
  --disable-shared-experts-fusion
Example: Kimi-K2.5 (RAWINT4)
Note: The following command is optimized for 4x RTX PRO 6000 Blackwell (96GB each) + AMD Threadripper PRO 5995WX (64 cores, 1 NUMA node) + 256GB RAM.
# Download the model
huggingface-cli download moonshotai/Kimi-K2.5 --local-dir /path/to/Kimi-K2.5

# Start the server
python -m sglang.launch_server \
  --host 0.0.0.0 --port 30000 \
  --model /path/to/Kimi-K2.5 \
  --kt-weight-path /path/to/Kimi-K2.5 \
  --kt-cpuinfer 64 \
  --kt-threadpool-count 1 \
  --kt-num-gpu-experts 228 \
  --kt-enable-dynamic-expert-update \
  --kt-method RAWINT4 \
  --attention-backend flashinfer \
  --trust-remote-code \
  --mem-fraction-static 0.95 \
  --chunked-prefill-size 8192 \
  --max-running-requests 4 \
  --context-length 262144 \
  --enable-mixed-chunk \
  --tensor-parallel-size 4 \
  --enable-p2p-check \
  --disable-shared-experts-fusion
Sending Requests
# Interactive chat
kt chat

# OpenAI-compatible API
curl http://localhost:30000/v1/chat/completions \
  -H "Content-Type: application/json" \
  -d '{"model":"Qwen3","messages":[{"role":"user","content":"Hello"}],"stream":true}'
Performance Tuning
--kt-cpuinfer: set to the number of physical cores--kt-threadpool-count: set to the number of NUMA nodes--kt-num-gpu-experts: higher values reduce CPU load but increase GPU VRAM usage- Memory bandwidth is often the bottleneck; high-frequency DDR5 memory helps significantly
FAQ
GPU OOM
- Reduce
--kt-num-gpu-experts,--chunked-prefill-size,--max-total-tokens - Lower
--mem-fraction-static
For more questions, see FAQ.
在 AVX2 CPU 上使用 KTransformers
本教程介绍如何在仅支持 AVX2 的机器上运行 KTransformers(无需 AVX512 或 AMX)。
目录
支持的精度格式
--kt-method | 精度 | 说明 |
|---|---|---|
BF16 | BF16 原精度 | 零精度损失,直接使用 BF16 权重 |
FP8 | FP8 分块量化 | |
GPTQ_INT4 | INT4 GPTQ | |
RAWINT4 | Raw INT4 + BF16 缩放因子 | Kimi-K2.5 专用;权重以压缩 SafeTensor 格式存储 |
硬件要求
- CPU:x86-64 + AVX2 + FMA(Intel Haswell 2013+ / AMD Zen+)
- GPU:NVIDIA 24GB+ 显存(RTX 3090/4090/5090 等)
- 内存:不少于模型权重大小(如 Qwen3-30B-A3B BF16 需 64GB+)
- 系统:Linux
安装
从源码编译安装(一键安装 kt-kernel + SGLang):
git clone https://github.com/kvcache-ai/ktransformers.git
cd ktransformers
git submodule update --init --recursive

# 一键安装
./install.sh
在AVX512, AMX机器上, 也可以手动强制 AVX2 编译:
export KT_RAWINT4_BACKEND=avx2
export CPUINFER_CPU_INSTRUCT=AVX2
export CPUINFER_ENABLE_AMX=OFF
./install.sh kt-kernel --manual
验证
# 检查 CPU 是否支持 AVX2
lscpu | grep -i avx2

# 检查 kt-kernel 加载的变体
python -c "import kt_kernel; print(kt_kernel.__cpu_variant__)"
# 预期输出:avx2

# 系统诊断
kt doctor
启动推理服务
使用 --kt-method BF16、FP8、GPTQ_INT4 或 RAWINT4,KT-Kernel 会自动检测 CPU 并在缺少 AVX512/AMX 时回退到 AVX2 后端。
示例:Qwen3-30B-A3B (BF16)
# 下载模型
huggingface-cli download Qwen/Qwen3-30B-A3B --local-dir /path/to/Qwen3-30B-A3B

# 查看物理核心数和 NUMA 节点数
lscpu | grep -E "^CPU\(s\)|Thread\(s\) per core|NUMA node\(s\)"

# 启动服务(按实际硬件调整 kt-cpuinfer 和 kt-threadpool-count)
python -m sglang.launch_server \
  --host 0.0.0.0 --port 30000 \
  --model /path/to/Qwen3-30B-A3B \
  --kt-weight-path /path/to/Qwen3-30B-A3B \
  --kt-cpuinfer 16 \
  --kt-threadpool-count 1 \
  --kt-num-gpu-experts 32 \
  --kt-method BF16 \
  --attention-backend flashinfer \
  --trust-remote-code \
  --mem-fraction-static 0.80 \
  --chunked-prefill-size 8192 \
  --max-running-requests 2 \
  --served-model-name Qwen3 \
  --enable-mixed-chunk \
  --tensor-parallel-size 1 \
  --enable-p2p-check \
  --disable-shared-experts-fusion
示例:Qwen3.5-35B-A3B-FP8 (FP8)
# 下载模型
huggingface-cli download Qwen/Qwen3.5-35B-A3B-FP8 --local-dir /path/to/Qwen3.5-35B-A3B-FP8

# 启动服务
python -m sglang.launch_server \
  --host 0.0.0.0 --port 30000 \
  --model /path/to/Qwen3.5-35B-A3B-FP8 \
  --kt-weight-path /path/to/Qwen3.5-35B-A3B-FP8 \
  --kt-cpuinfer 16 \
  --kt-threadpool-count 1 \
  --kt-num-gpu-experts 2 \
  --kt-method FP8 \
  --kt-gpu-prefill-token-threshold 400 \
  --attention-backend triton \
  --trust-remote-code \
  --mem-fraction-static 0.85 \
  --chunked-prefill-size 4096 \
  --max-running-requests 1 \
  --max-total-tokens 32000 \
  --enable-mixed-chunk \
  --tensor-parallel-size 1 \
  --disable-shared-experts-fusion
示例:Qwen3-30B-A3B-GPTQ-Int4 (GPTQ_INT4)
# 下载模型
huggingface-cli download Qwen/Qwen3-30B-A3B-GPTQ-Int4 --local-dir /path/to/Qwen3-30B-A3B-GPTQ-Int4

# 启动服务
python -m sglang.launch_server \
  --host 0.0.0.0 --port 30000 \
  --model /path/to/Qwen3-30B-A3B-GPTQ-Int4 \
  --kt-weight-path /path/to/Qwen3-30B-A3B-GPTQ-Int4 \
  --kt-cpuinfer 16 \
  --kt-threadpool-count 1 \
  --kt-num-gpu-experts 2 \
  --kt-method GPTQ_INT4 \
  --attention-backend triton \
  --trust-remote-code \
  --mem-fraction-static 0.85 \
  --chunked-prefill-size 4096 \
  --max-running-requests 1 \
  --max-total-tokens 32000 \
  --enable-mixed-chunk \
  --tensor-parallel-size 1 \
  --disable-shared-experts-fusion
示例:Kimi-K2.5 (RAWINT4)
说明:以下命令针对 4x RTX PRO 6000 Blackwell(各 96GB)+ AMD Threadripper PRO 5995WX(64 核,1 NUMA 节点)+ 256GB RAM 优化。
# 下载模型
huggingface-cli download moonshotai/Kimi-K2.5 --local-dir /path/to/Kimi-K2.5

# 启动服务
python -m sglang.launch_server \
  --host 0.0.0.0 --port 30000 \
  --model /path/to/Kimi-K2.5 \
  --kt-weight-path /path/to/Kimi-K2.5 \
  --kt-cpuinfer 64 \
  --kt-threadpool-count 1 \
  --kt-num-gpu-experts 228 \
  --kt-enable-dynamic-expert-update \
  --kt-method RAWINT4 \
  --attention-backend flashinfer \
  --trust-remote-code \
  --mem-fraction-static 0.95 \
  --chunked-prefill-size 8192 \
  --max-running-requests 4 \
  --context-length 262144 \
  --enable-mixed-chunk \
  --tensor-parallel-size 4 \
  --enable-p2p-check \
  --disable-shared-experts-fusion
发送请求
# 交互聊天
kt chat

# OpenAI 兼容 API
curl http://localhost:30000/v1/chat/completions \
  -H "Content-Type: application/json" \
  -d '{"model":"Qwen3","messages":[{"role":"user","content":"你好"}],"stream":true}'
性能调优
--kt-cpuinfer设为物理核心数--kt-threadpool-count设为 NUMA 节点数--kt-num-gpu-experts越大 CPU 负担越小,但 GPU 显存占用越高- 内存带宽往往是瓶颈,DDR5 高频内存有明显帮助
常见问题
GPU OOM
- 减小
--kt-num-gpu-experts、--chunked-prefill-size、--max-total-tokens - 降低
--mem-fraction-static
更多问题参见 FAQ。